
How concerned are you with protecting your tile installations from the horrors of bond breakers? If you're serious about it, you will spend time inspecting and preparing your substrate so as to prevent any situations from developing. Yes, substrate preparation includes determining whether the floor or wall surface will be bondable, and, most importantly, this needs to be completed prior to installing tile.
What Can Prevent a Tile Bond?
A bond breaker is defined in the NTCA Reference Manual as,
“Any material preventing adhesion.”
Examples of these contaminants or impurities include dust, dirt, sealers, coatings, existing adhesives, residue from previous products installed, oil, wax grease, paint, curing compounds, loose particles, drywall dust and even standing water.
According to Bond Breakers | Concrete Slab Bond Breakers, you also need to be concerned about finishing techniques. More specifically,
4 Tile Surface Preparation Bond Watchouts!
Let's focus on four specific bonding watch-outs: concrete, paint, drywall dust, and standing water.
1. Concrete Surfaces
Interestingly, if you're in the concrete business, a bond breaker is not only a positive but often a requirement. According to Corrosionpedia,
"Bond breakers are critical components required for tilt-up construction techniques and are cost-effective and time-saving for large structures. Furthermore, they enable the lifting and moving of precast members after stripping them in the intended shape.
Bond breakers eliminate cracking of concrete slabs, due to temperature and moisture variation, and help avoid shrinkage cracks in certain applications, such as tilt wall panels."
When it comes to tile installation, though, you have a major issue.
In fact, on concrete surfaces, the number one foe of an adequate bond is a curing compound that is sprayed on recently finished concrete. Some of these products are designed to degrade under ultraviolet light, but how many interior floors see enough sunlight to cause the coating to disappear?
If the concrete looks clean, try placing a few drops of water on it. If you notice that the water penetrates immediately, that's an indication that the concrete needs minimal preparation and will allow the mortar to form a good bond.
Solution: mechanically abrade the concrete
The only method to properly prepare the floor is to mechanically abrade the concrete using shot blasting or bead blasting equipment that removes a thin layer of the surface along with the curing compound.
2. Paint Overspray
On many
All too often, the
This paint mess should never have occurred in the first place. The painter should have placed a drop cloth on the floor, pausing briefly to move it as needed. Unfortunately, this seldom happens.
Solution: contact the architect and general contractor
If paint overspray or general sloppiness by the painter is found on the job site, take photos of the problem and email them along with an “RFI” (request for information) to the architect and general contractor. One or both of them should respond with the method which will eliminate the issue. If the tile installer is instructed to perform this work, it should also include a change order which will compensate the tile contractor for labor and appropriate rental equipment necessary to remove the residue.
Furthermore, the use of paint removers, solvents, or citrus-based cleaners should never be permitted. These products will emulsify the residue (into a liquid) which will travel even deeper into the concrete, making it nearly impossible to remove.
3. Drywall Dust
Drywall dust is a surface contaminant that is seldom removed properly.
The easy method is to get the string mop and swab the deck. Unfortunately, this turns the drywall dust back into what was in the bucket originally, a paste, which is now being smeared over the floor.
Solution: vacuum with a HEPA vacuum and then wet mop the floor
The proper method is to use a high-quality High-Efficiency Particulate Air (HEPA) filtered vacuum which meets the requirements of the Occupational Safety and Health Administration (OSHA) to remove the remaining dust.
Now it is time to wet mop the floor.
4. Standing Water
Although it is wise to dampen the floor or wall substrate before installing tile, standing water is a problem that will not allow the mortar to bond. It needs to be dampened, but not wet.
The industry term used for this dampening of the substrate is surface saturated dry or SSD. This means the substrate has accepted moisture, but the surface to be tiled is dry (no standing water).
One additional caution. When working outside or in non-enclosed building areas, be aware of high humidity conditions during the early part of the day which can coat the horizontal substrate with water or “dew”. This water must be eliminated and allowed to dry.
Solution: eliminate the standing water source
Determine the source of the water and eliminate it before tiling.
What must you do if you notice a bond breaker?
If you've attended any of the NTCA training sessions, you have noticed that the trainers regularly bring up bond breakers and encourage you to wipe the surfaces to remove dust and debris as part of your surface preparation protocol. That's how important it is to do this on every job.
When it comes to anything that will inhibit the bond of tile to the substrate, you must properly remove it or be prepared to personally pay the failure replacement costs.
Here are my recommendations if you notice bond breakers:
- Every time you as an installer look at a new job, be sure to thoroughly review the condition of the substrate to determine if the surface to be tiled is adequate.
- If the surface is contaminated in any way, you must notify the architect, general contractor, and/or the owner by letter or email of this condition.
- Determine how to address the situation and who will be paying for the required work before proceeding further with the tile installation.

And, if you do nothing about surface preparation...
As a tile installer, you have a decision to make. You can accept the floor or wall as is and tile over it (remember, you tile it, you own it) or write emails to all the interested parties which may delay the schedule causing unhappiness to the general contractor.
We all know that the paint (or other bond breakers) should be removed, without question. But you just might decide to do nothing, and instead - to get a good bond to the painted surface - buy the mortar manufacturer's “super sticky stuff” and get it done.
Here's what that decision leads to. The job is complete. Everyone is paid and life is good…..
- Until the owner calls saying, “WE have hollow-sounding tile which is not acceptable.”
- A quick trip to the
job site reveals just that, hollow-sounding tile.
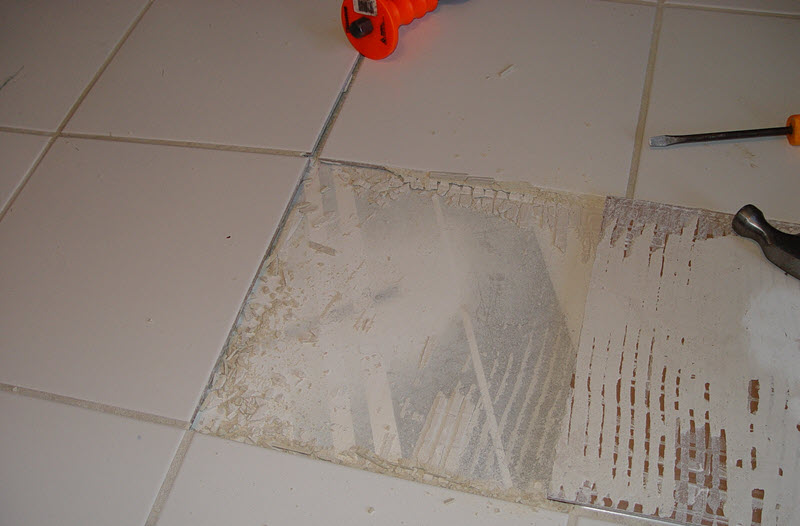
Now it’s time to call the mortar manufacturer since the thin-set supposedly didn’t bond to the floor. When the mortar rep arrives, a tile is removed, as seen in the photo above, showing the tile with thin-set mortar well bonded to the back of the tile. The interesting thing here is that now some of the paint is well bonded to the thin-set and some of the
Next comes the reality check; the installer is at fault (Remember, the paint should have been removed).
The thin-set manufacturer is in the clear. The product used did what it was designed to do, bond the tile to the surface beneath. Unfortunately, it is the paint, not the concrete. The last time I checked, paint manufacturers don’t warrant their products as a bonding agent for thin-set mortar.
Tile Substrate Preparation 101: Banish All Possible Mortar Bond Breakers!
Stick to your guns and get paid (as you should) to fix or clean the floor before the job begins. Otherwise, the cost of the callback and the replacement tile work comes out of the installer’s pocket. A lose-lose situation no matter how you spread it.
Do your customer and yourself a favor, do it right… the first time.
Thanks for reading,
Scott

Note: We originally published this article on 03/06/2019, and have updated it.