
Do you know how to install glass tile correctly? After all, it's beautiful and on-trend which usually means that customers will ask you about it for kitchen backsplashes, bathrooms, and showers. As you might imagine, when installed correctly, this stunning product provides years of enjoyment.
At the same time, if you - as an installer - haven't done your homework, you'll wish you had never heard of it!
Here's what goes into doing your homework for installing glass tile.
5 Steps on How To Install Glass Tile
Step 1 - What type of glass tile is being used?
A critical aspect of a successful glass tile installation is to understand what type of glass tile is being considered, both in terms of how it's made and its size.
How glass tile is made
Not all glass tiles are made the same way, to the same specifications, nor can they be used in all of the same applications. Some are made in boutique shops where the unique nature of each tile is what's important. Others are made according to consistent manufacturing processes. You'll find, though, three categories of glass tile:
- Cast glass tile with inherent folds, bubbles, and creases
- Fused glass tile which is altered using a heat process to create a variety of colors and patterns
- Low-temperature coated glass tile which receives its character from the product that is bonded to the back of the tile
Each of these three categories carries different requirements as to how and where it is to be used. Each has different internal stress points based on how it was made.
In addition, some glass tiles come with specific types of backing that may not be compatible with wet environments. That may not be an issue for a kitchen backsplash; it will be an issue in a shower.
Before beginning the installation process, determine the suitability of the tile for its intended end use and if it meets the requirements of ANSI 137.2.
What size glass tile is it
We've discussed in previous articles how the installer needs to pay attention to the tile size and the installation materials required for larger-sized tile.
This holds for glass tile, as well. ANSI 137.2 defines a large-format glass tile as one with dimensions greater than three inches by three inches which requires specific materials.
Step 2 - What will you use to bond the glass tile to the substrate?
Ceramic and porcelain tile can normally be adhered to a properly prepared substrate with a good quality A118.4 latex-modified Portland cement mortar. Glass tile, however, is not in the “one size fits all category.”
For instance, if a highly latex-modified mortar is used to install a low-temperature coated glass tile in which the mortar has a stronger bond than does the coating to the back of the glass, the coating may become distorted and look like crumpled aluminum foil.
Because glass has a smooth surface, it requires a bond strength greater than four hundred psi.
To be certain that this doesn’t happen, always contact the manufacturer of the glass tile, the company selling the glass, and the mortar manufacturer. Always obtain the installation requirements in writing as to what should be done and used.
Expect to use a premium high-performance thin set mortar which has a higher polymer content to achieve a strong chemical bond especially if the tiles are large format tile.
Glass Tile is Often Transparent
Unlike traditional ceramic tile, glass tile is often transparent or translucent which requires specific mortars. Using any kind of poor installation techniques - will be visible.
- Consider the color of the thin-set mortar
- Consider the proper thin-set installation technique
In the first video below, you'll notice the following technique:
- Clean the substrate
- Apply the mortar using the appropriate notch in straight lines
- Prime the flat edge of the trowel with a small amount of mortar
- Knock down the mortar ridges
- Back butter the clear glass tile with a thin film of about a sixteenth of an inch
- Place the tile into the flattened mortar and beat it in using a beating block and a mallet or grout float to eliminate any voids
Step 3 - Is the substrate properly prepared?
Surface preparation for any kind of tile installation is critical. Again, this is especially true for glass tile.
The substrate must be fully prepared and clean before installing the tile. Ensure that you have no deflection that might affect glass. Glass is fragile and needs additional support to resist cracking.
Don't forget to include movement accommodation or expansion joints.
Failures in glass often result from expansion due to exposure to heat from sunlight or from steam/hot water. Expansion joints help mitigate these failures.
>> See Why Do You Need Expansion Joints When Installing Tile?
Step 4 - What grout will you use for your glass tile installation?
When it comes to the grout selection, be sure to check the manufacturer's directions and recommendations relating to exposure to water and whether the grout will scratch the surface of the tile.
Determine the best products to use for cleaning grout haze off of the glass surface.
Step 5 - Be aware of these watch outs
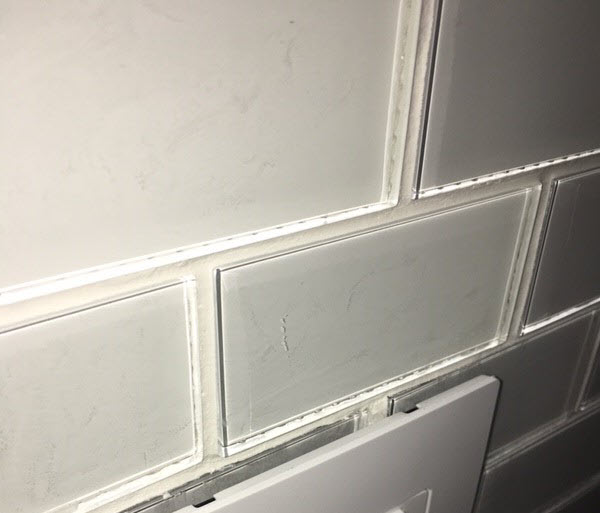
1. Moisture trapped between the glass and the substrate
as seen in the attached photo.
In this case, the clear-colored glass tile allows the trapped moisture to show through as a different shade. This one failed due to its inconsistent appearance and had to be replaced - twice.
2. Pay attention to the tile backing
- Metallic or painted backings can react with cement-based thin-set mortars in wet environments causing them to loosen the bond between the mortar and the glass tile.
- Some glass mosaic tiles are mesh-mounted using adhesives that are water-sensitive. These adhesives can break down when wet causing a bond failure.
3. Never use mastic
We have to say it: Don't ever use mastic. The second video below reinforces this point.
Top 5 Tips for Installing Glass Tile
In the video below titled "Top 5 Tips for Installing Glass Tile," Mike Micalizzi, Director of Technical Services for Custom Building Products makes several valuable points.
How To Install Glass Tile Kitchen Backsplash
In this next video, Sal DiBlasi, Elite-Tile Company, in the Boston North Shore area, demonstrates how he installed glass tile on a kitchen backsplash. Note how he implements many of the recommendations detailed above.
Thin Set Mortar
He uses a high polymer content thin set suitable for glass tile that is neither a mosaic tile nor transparent.
This glass tile is a large format 2"x8" that has an opaque white baking so the color of the tile is not dependent on the color of thin-set on the tile back. However, it's still necessary to use a white thin set that is suitable for this purpose. He uses the same color thin set across the entire project to ensure color consistency in a project that may require multiple bags of product.
No Mastic
Note that Sal reminds us not to use mastic ever for any kind of glass tile, nor a lower or inferior grade of thin set.
Using a lower quality thinset can cause variation in color and shading of the glass tile, and also result in tiles not adhering to the mortar.
The Trowel
This particular tile required (per the manufacturer) the use of a 3/16" v-notched trowel.
Tile Cuts
He set this glass tile in a running bond pattern with some exposed edges of the glass tile at the end of the countertop. Those that hadn't been cut he set in place "as is."
But Sal had to polish the cut edges to approximate the factory edge which achieved a pleasant consistent finished edge.
Unsanded Grout
He allowed the tile to set at the very least overnight before grouting and used a white unsanded grout mixed with a grout additive to achieve a highly stain-resistant grout.
Some glass tiles will be scratched if a sanded grout is used, as was the case with this glass tile which is why he chose an unsanded grout with a narrow 1/16" grout joint between tiles.
Expansion Joints are a Must
Because glass tile is subject to greater movement due to expansion and contraction than a typical ceramic tile, a soft joint is necessary at all changes of plane and where the tile meets a dissimilar material.
Always refer to the Tile Council of North America (TCNA) Handbook for more specific recommendations.
What Would You Add to These How-to Steps for Installing Glass Tile?
Mike Micalizzi says it best:
"Glass tile installations are a thing of beauty and when set properly with the right materials they'll last a lifetime. Don't cut corners on surface prep or installation; do your homework, know what you're working with, and use the right materials."
Be aware of the issues that surround glass. When asked to install a glass tile that is unfamiliar to you, do your homework, ask questions, and get answers in writing before doing the job. This will keep the failure monster out of your wallet.
If you're an installer who sets all tile products correctly, consider learning more about the Certified Tile Installer program.
Thanks for reading.

Note: We originally published this post on July 2, 2019, and have updated it.