
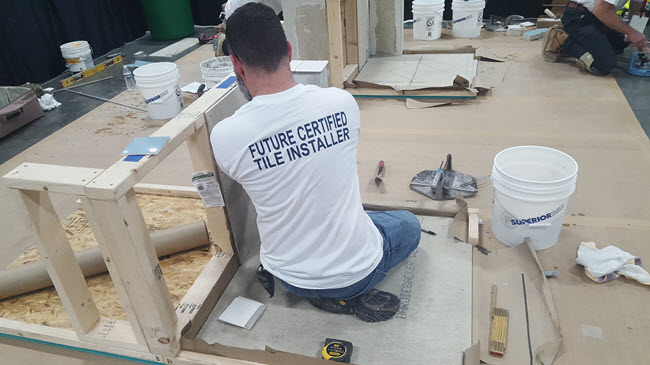
CTEF has evolved the Certified Tile Installer (CTI) hands-on test with a transition from bullnose to metal transition profiles. In this article, I'll share perspective on the change as, by now, you may have seen and heard about it.
Evolving From Coordinating Bullnose to Metal Profiles
This change affects the outside edges of the hands-on testing module at the knee wall where until recently, a future CTI would have used a bullnose that coordinated with tile. Now, you would use a metal transition profile.
In case the change doesn't make sense, let me explain why CTEF has made this decision. I'll discuss the issue, and highlight the ramifications of the change and evolving the CTI hands-on test.
As always, I welcome your feedback.
The Goal of the CTI Hands-on Testing Module
Let's start with the CTI hands-on testing module goal.
CTI tests happen around the country, at tile industry events, as well as at the two CTEF locations in Egg Harbor City, NJ, and Pendleton, SC. Critical to those tests is having a consistent module and similar materials to ensure that the tests are consistent regardless of time and location, and can be easily shipped and stored.
In other words, how CTEF has designed the test, the module, and the materials must work for logistics, repeatability, and inspection.
- We designed the module so it can be separated and stacked into an arrangement that can be shipped and stored on a 42” pallet.
- We chose the materials because of their relatively low cost and availability, as well as cutting and fitting qualities.
- We developed the test to fit nicely with the module while offering a challenging layout puzzle.
Tile Size & Bullnose Challenges
For many years, 4.25” tile and coordinating trims were staples readily available on distributor shelves across the country. Unfortunately, that isn’t universally the case anymore.
We have expanded to allow for 3” x 6” tile which is popular and that hosts (who generously provide materials for the tests) can usually source with 4.25” or 3” x 6” with ease.
However, it has become increasingly harder for CTEF to locate and secure bullnose, especially coordinating out corners. You may have seen a kaleidoscope of colors on test modules in the last few years because of this!
Why Metal Transition Profiles?
To keep the cost of the CTI test low for installers, we have elected to change the transition wall materials to metal profiles.
We like metal because it stays straight and true.
Plastic trims can be forced with tape to follow a nonlinear edge (bowed wall or inconsistent cuts).
Why Square or Round Metal Transition Profiles?
Until we gather more data, square and round metal profiles appear to be the most available materials and the best challenge relative to bullnose.
The attributes of having an equal-sized projection on all planes (rather than an “L” shaped trim), having a coordinating out corner, and being able to safely trim out a wall in a wet area make these shapes viable.
Remember, there is no installation standard for metal profile trims (yet!), so we have the freedom to establish a specification.
Although miters are common, they do take time to make perfect and their safety is arguable. Out corners make the most sense.
Don’t Metal Profiles Take More Time?
Metal profiles depend on the skill of the installer.
Technically it is only five cuts to measure and make, but it is an additional five cuts as the amount of tile to cut is the same.
At the same time, the argument can be made that metal trims make it faster because you can establish the boundaries of the plane quickly, rather than building it one piece at a time, as with bullnose.
How Can I Cut Metal Transition Profiles During the Test?
CTEF does not allow electric chop or miter saws, nor angle grinders of any kind.
As we do tests around the country in many different places with many different installers, we do not want to create a situation where we require more space or electricity and create more risk for injury. We want to avoid flying pieces of metal and any situation where inexperienced persons use a tool they are not familiar with.
Although it is arguable whether wet saws should be used to cut metal trim (damage to blades and safety), we will allow it.
Metal trims can also be cut with a hacksaw or battery-powered bandsaw.
In all instances, filing or final shaping of the metal is usually necessary to get the best final fit and finish.
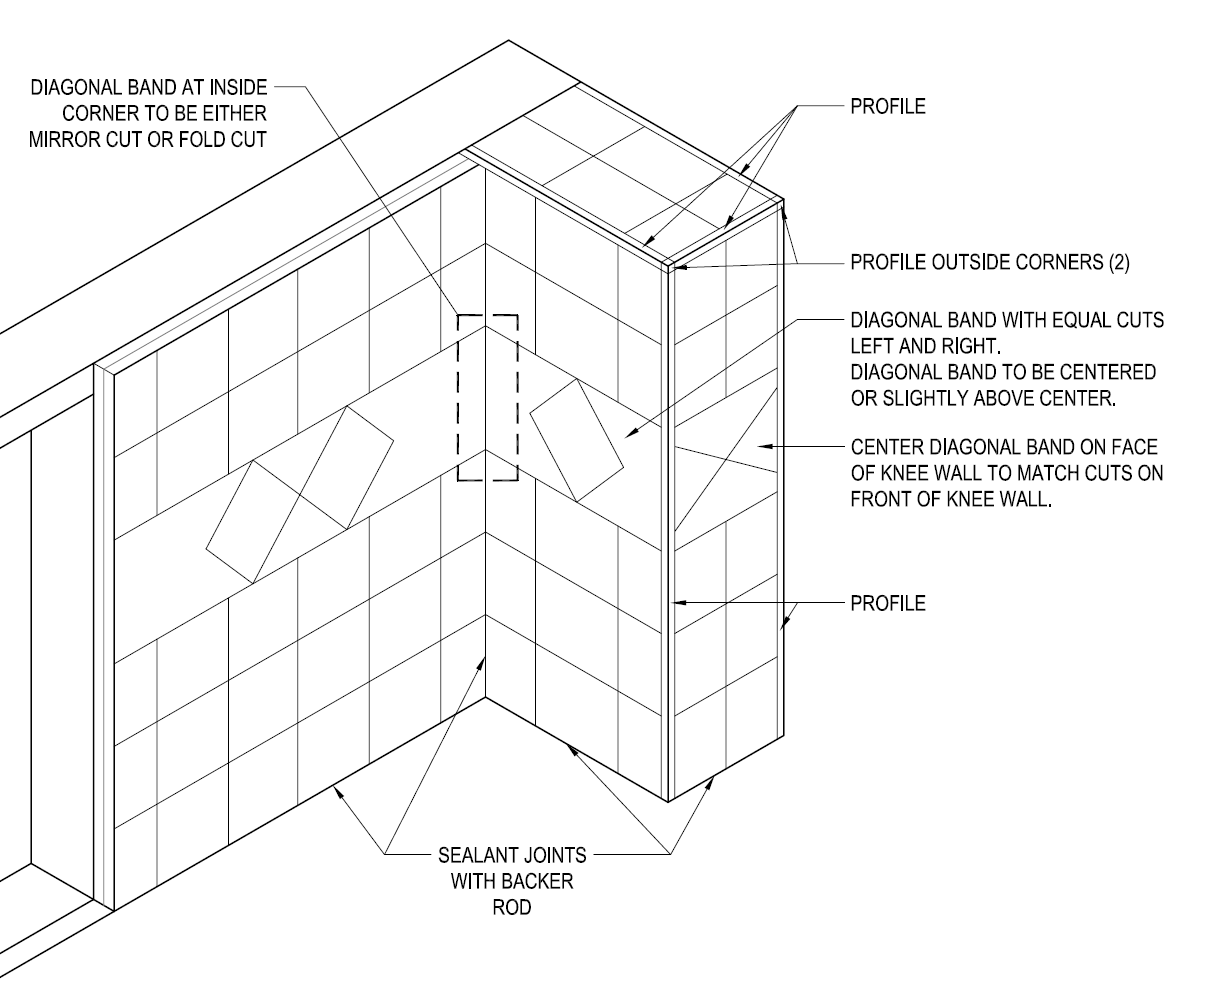
How Do I Know Where to Install the Metal Profiles?
Our very generous contractor supporter, D.W. Sanders, sponsored new shop drawings for the test.
In them, you can clearly see where the profiles are to be installed. If this is a format of communication you aren't familiar with, please let us know at orientation and we can work with you to help you understand.
How Else Will the CTI Hands-on Test Change?
Great question!!
As the industry changes and new standards develop, we will certainly change the CTI test. We strive to provide the best examination of installer skills relative to the methods and standards of the industry.
Many manufacturers do a wonderful job with proprietary training. Although in the future we may have specific test parameters depending on the products being used, we will always seek to examine the same skills and knowledge we examine today, based on ANSI A108.02-4.3 and reasonable professional expectations.
More specifically, and as detailed in the Certified Tile Installer videos,
- Follow directions
- Understand assemblies
- Proper preparation
- Measure
- Layout according to a drawing and alignment along different planes
- Cut, fit, and finish tile and related materials
- Install level and plumb where critical
- Allow for movement joints
- Grout
- Sealant
- Cleanliness
- Time management
What's Your Reaction to Evolving from Bullnose to Metal Transition Profiles?
If you have questions about this or any other aspect of the test, please reach out. You can complete the comment form below or contact us.
Thank you for reading.

Comments Received:
Russell Laird - March 14, 2024
I think that many good tile setters do not have much experience with installing profiles. I know I have installed a lot over the years and I am still learning better ,faster, cleaner ways to do it. The Test is/was difficult for the average good tile setter to complete with a acceptable level of quality in the allotted time. I believe you will se more failures if you are still holding the setters to the same quality standards. Not saying it can't be done but perhaps it would take a bit longer especially if you are also looking at 95% bond of the metal trim pieces as should be as it is a wet area simulation on the inside of the pony wall. Keep up the good work Brad
Response from Brad Denny:
Russell, Thank you for engaging on this topic! We are certainly keeping a close eye on the fail rate.
Anytime something is changed or something new is introduced to the test, we try to do practical research, like timed mockups to examine their effect on the test. In this case, I did a few different iterations using profiles and Scott timed me, focusing only on the pony. I didn’t try to go super-fast, just logically followed my instinct on how best to address it. In both cases the walls had board applied and I had quickly put a shim under the board on the top of the pony to achieve pitch to the interior of the module.
To be transparent, we are not checking ALL profiles, but certainly a few critical areas, like you mentioned.
Module A
• I planned to overlap the tape, i.e. I cut pieces for each ~11” edge on top, one for the ~5 piece, and pieces for each of the vertical edges on the face of the knee/pony wall. When I installed the tape with mortar it created a two-layer build up near the corner. Because this is a small area, I completely skimmed the wall when bedding the tape, following a similar technique to screeding mortar by allowing the two-layer overlapped corner be the starting high point of my skim coat. I waited ~30 minutes before moving to the next step to mimic doing work in other areas to allow the tape and mortar to firm up.
• I installed an 80mm profile with anchoring legs on the top of the pony and the face of the pony, keying in the mortar first, notching the board, bedding the profile, then striking the mortar down with the flat end of a trowel and essentially screeding off the anchoring leg to flatten the plane with a mortar thickness relative to the thickness of the anchoring leg. I used a scrap piece of wall tile to gauge the placement of the profile relative to the back and front of the pony wall, used a folding ruler to ensure they were parallel on top, and a box level to make sure they were plumb on the face of the pony. This is when I noticed the overlap caused a very tiny amount of disparity along the edges (the front outside pony wall top ~5” edge was a little wider than the back of the pony top, but I did not have the back wall installed with the tape there where I would have had two layers had I follow the same procedure).
• I waited 15 minutes mimicking time to organize myself for layout and allowed the mortar to firm up.
• I laid out the pony walls based on the inside pony wall installer directions, then set the inside, the outside, the top and the face. Each plane took ~17-28 minutes for cutting and installing using a Superior 2a cutting board and diamond sanding pad.
• When doing the evaluation, I missed a few points because my tiles were not as flush as they should be on the pony inside and outside walls at the top. We felt it was because of the overlap. On the top, the 80mm was barely thick enough to accommodate the wall tile and I had to vigorously push and wiggle them in. Adequate 3/32” thinset mortar between the top face of the profile and the bottom of the tile was arguable. Because the width between the profiles was not perfectly parallel, I was forced to cheat joint spacing, but it was within tolerance.
Module B
• I planned to avoid tape overlap, i.e. I cut a length of tape for the entire top adding the two ~11” pieces and the ~5” pieces. I then cut one for each of the vertical edges on the face of the knee/pony wall careful to avoid overlapping the piece around the top. When I installed the tape with mortar around the top, I ran it on the face first allowing it to stick up past the top, then cut the tape, removing “V” shaped sections, so it would fold down on the top without creating overlap. Similar to module A, I completely skimmed the wall when bedding the tape, following a similar technique to screeding mortar by allowing the tape to be my screed. I waited ~30 minutes before moving to the next step to mimic doing work in other areas to allow the tape and mortar to firm up.
• I installed an 100mm profile with anchoring legs on the inside and outside walls of the pony, keying in the mortar first, notching the board, bedding the profile, then striking the mortar down with the flat end of a trowel and essentially screeding off the anchoring leg to flatten the plane with a mortar thickness relative to the thickness of the anchoring leg. I used a scrap piece of wall tile to gauge the placement of the profile relative to the top and face of the pony wall, and used a folding ruler to ensure they were parallel on top and a box level to make sure they were plumb on the face of the pony. This is when I noticed the top and face of my module was less than perfect in relation to plumb and level and proper pitch to the inside of the modules, but I used the parameters of the profiles to set my layout level and plumb. I also noticed the 100mm profile needed more build out on the inside and outside walls to truly be flush, so I waited 15 minutes while pretending to be busy elsewhere, the skimmed again in hopes to adding a very tiny additional thickness on top of the profile anchoring leg.
• I waited 15 minutes mimicking time to organize myself for layout and allowed the mortar to firm up.
• I laid out the pony walls based on the inside pony wall installer directions, then set the inside, the outside, the top and the face. Each plane took ~17-28 minutes for cutting and installing using a Superior 2a cutting board and diamond sanding pad.
• When doing the evaluation, I was on the cusp of missing a few points for mortar thickness because I back buttered tiles on the top and face of the module to get them perfectly flush with the profiles but was within tolerance.
My coverage was sufficient, but I would have had some time to clean joints before grouting. On the inside and outside walls of the pony, they were not as flush as they should be with the profile being a bit too thick for the installation. I would’ve had to use a thicker notch and/or back butter the tiles to get the coverage and thickness of mortar, however, it still would’ve been within tolerance.
Our conclusion was, there will be different types of approaches, and over time strategies developed to help make this version more efficient. However, out of the 60+ installers who have done a test with profiles and the installer did not finish, the evaluator noted other places they could have done better with time management in other places, and it wasn’t just the profiles. We have been seeing installers not being as clean with the cuts and arrangement of profiles and missing out on points, but that has much to do with techniques, like cutting boards to fit properly to create crips out corners, deciding which planes to install the anchoring leg, proper notch trowels, order of operations, timing, etc. all of which are reasonable things to be examined in a certification test.
We hope installers have more educational opportunities in advance of test, like our 200 Level class, where we speak to many of these issues. In time, we may be able to provide training videos, like we have in the past.
Please continue to stay in touch and thank you for your support of CTEF!
Alex Smith - March 26, 2024
Brad, I welcome this change. Thanks to you and Scott for continuing to innovative, and evolving the CTI test module in alignment with industry trends. I for one, will take a profile over bullnose any day! Keep doing the important work that you do. See you at Coverings 2024. With gratitude, Alex
Response from Brad Denny:
Thank you, Alex!
It can be difficult to stay relevant yet true to methods and standards. Being too trendy means we aren't actually testing on the real basic skills needed to identify a reliable installer, but not making change can cause stagnation. In this case, we are slightly ahead of methods and standards, however, I think we will see one soon. Regardless, the products are used frequently enough and consumers are choosing them, so including them in the test seemed reasonable.
Stay tuned for more change as the industry works together to define newer products with new installation standards!