

What challenges have you encountered getting the coverage you need under large wall tile? There are two aspects to this question.
The first has to do with size. Many projects today call for ever-increasing tile sizes, many of which are rectangular shapes such as 12” x 24”, 18” x 36”, 24” x 48”, and larger creating difficulties for the installer when bonding the tile to the substrate.
>> See Do You Have Enough Mortar to Accommodate Most Tile Warpage?
What is Acceptable Coverage Under Tile?
Tile industry standards require minimum mortar coverage of 80% in dry areas and 95% in wet (showers) or exterior areas. Natural stone tile installations require 95% coverage in all applications.
This refers to the contact area of the bonding material (thin-bed mortars, large and heavy tile mortars, or epoxy adhesives) with both the back of the tile and the surface being tiled.
Although wall tile is not walked on, there are several reasons adequate mortar coverage is critical for success.
- In areas where carts, dollies, or furniture can impact the wall surface, the lack of the minimum required mortar coverage will normally result in cracked tile.
- When tile is installed in wet environments such as a shower, which requires 95% coverage, water can fill the areas where there are gaps or voids in the mortar, especially along the tile edges. This trapped water acts as a reservoir that always finds its way to the dry side of the wall. As this water migration takes place, the cement-based grout will turn temporarily darker. Once the water evaporates, the original grout color usually returns…..until it gets wet the next time. This situation is almost always unacceptable to the customer.
- Freezing temperatures affect these mortar-missing voids similarly to the shower scenario. Unfortunately, in this environment, the water freezes, expands and causes the tile to crack and possibly sheer from the face of the wall.
The application of the ill-advised spot-bonding trick has become a quick and dirty disaster that almost always fails. This is where dollops of mortar are placed on the four corners and the middle of the back of the tile. This trick can produce a tile surface that is flat with a minimal amount of lippage, but it is impossible to achieve the required 80% dry or 95% wet coverage. Spot bonding, no matter what some people say, is a failure waiting to happen.
For this reason, you don't ever want to rely on spot bonding which creates bare spots and voids under the tile.
>> See Why You Need to Eliminate Spot Bonding When Installing Ceramic Tile
Why the Focus on Walls Rather Than Floors?
Most times obtaining acceptable coverage on the floor is not as difficult since the installer’s weight can be used to help collapse the trowel ridges into the valleys while moving the tile back and forth as shown in the NTCA Trowel and Error video.
>> See How to Correctly Trowel Mortar When Installing Tile
However, when these same tile sizes are installed on wall surfaces where gravity is not your friend, obtaining the required coverage becomes more difficult.
Large Wall Tile is Cumbersome to Handle
These larger tiles can be cumbersome to handle by one installer and can be challenging to move in the back and forth motion.
Narrow Grout Joints Complicate Matters
The installation can be further complicated by the job requirement of narrow grout joints. These narrow joints do not allow the tile to be moved more than this width which may not collapse the ridges completely.
>> See Want Credit Card Grout Joints? First Check Tile Industry Standards.
How to Get the Coverage Needed Under Large Wall Tile
Here are four ways that can help achieve the required mortar coverage under large wall tile in particular.
1. Check the Flatness of the Wall
First and most importantly, always check the flatness of the wall with a 10’ straightedge.

Remember that the ANSI requirement for tiles with any side longer than fifteen inches, the flatness requirement is 1/8” in 10’. This is determined by measuring the distance between the bottom of the straightedge and the substrate.
Flattening the wall with the appropriate flash patch to meet this requirement will make the installation of the tile much easier and faster.
For additional perspective on flatness, read these articles:
>> Is Your Floor or Wall Flat Enough for Large Format Tile?
>> A Flat Floor vs. a Level Floor: What's the Difference?
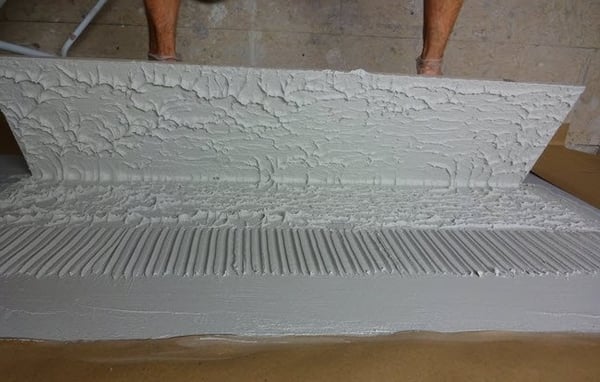
2. Comb the Mortar Parallel to the Short Side of the Tile
After cleaning and dampening the surface, properly key the mortar into the substrate with the flat side of the trowel and change the direction of the straight line troweling method.
Whichever way the tile is being installed (vertically or horizontally), comb the mortar parallel to the short side of the tile. This way the trapped air under the tile has a shorter distance to travel.
For example, if a 12” x 48” tile is being installed, the mortar ridges should be in the same direction as the 12” side as seen in the photo below.
3. Use Suction Cups as Handles for Large Wall Tile
Use suction cups applied to the face of the tile. Two suction cups will provide a “handle” on each side of the tile face which makes moving the tile back and forth more easily accomplished.4. Deeper, Narrower Trowel Notches Yield Better Coverage
Consider using a trowel that has deeper and narrower notches such as a 1/4” x 1/2” x 1/4”, a “U” notch such as a ¾” x 9/16” x 3/8”, or a zipper notch. This way the tile needs only to move a short distance each way, yielding better coverage.As you can see from these four recommendations, just a few small changes in technique can really make a difference when it comes to getting the coverage you need under large wall tile.
Additional Notes on Correctly Troweling Mortar
The NTCA Trowel & Error video generated several questions worth addressing in this article, as they directly relate to achieving acceptable coverage under tile.
1. The Importance of Moving Tile in Only One Direction
Troweling mortar in one direction (either east and west or north and south) as seen in the National Tile Contractors Association Trowel & Error video yields the best mortar coverage on the back of the tile.
As we've discussed in this article, you want to place the tile into the mortar moving it in a back and forth motion perpendicular to the trowel ridges. This movement collapses the trowel ridges into the valleys leaving very few if any voids in the mortar which supports the entire back of the tile.
Trowel ridges running in straight lines are much easier to collapse. Furthermore, they assist with air removal to maximize mortar coverage and ensure a strong bond to the tile and substrate.
2. The Reason for Using the Flat Side of the Trowel to Key-In Mortar
- The first step in the troweling process is to use the flat side of the trowel to key or burn a coat of mortar into the substrate for a good mechanical bond.
- Then, add more mortar to the substrate combing the mortar in straight lines, all going in one direction. Combing the trowel ridges in straight lines provides better distribution of the mortar.
- When installing rectangular (plank) tiles, the trowel ridges should go in the same direction as the short side of the tile. This allows better air release from under the tile since the air travels a much shorter distance when you bed the tile.
- Be careful not to leave any voids along chalk lines or between tiles.
- Use a trowel that will help you achieve a continuous minimum 3/32” coverage. Larger tiles most often require deeper notched trowels.
The goal of this process is to achieve tile industry-required mortar coverage thereby enabling the tile to be fully bonded to the substrate.
The Tile Installation Experience with Scott Carothers at Coverings.
Thank you for reading.
Scott
Note: We originally published this article on 04/03/2018, and have updated it.