

If you're asking how to trowel mortar when installing tile, realize that you are asking a fundamentally critical question. It's so critical that readers like you have made this CTEF Blog article the one with the highest readership since we originally published it on June 7, 2016.
You see, when thin-set mortar is incorrectly applied, the installation will many times fail. More likely than not, the tile will break - as you see in the image below.
Not a good situation for the customer and a terrible one for everyone involved in installing tile correctly.
Let's focus then on how to properly apply the mortar.
What function do thin set and large and heavy tile mortars serve?
Thin-set and the new large and heavy tile (LHT) mortars serve several functions within a tile assembly:
- They bond to the substrate
- They support the tile
- They bond to the back of the tile.
The way you trowel mortar for setting tile makes a big difference. Porcelain tiles, in particular, can withstand extra heavy service conditions by taking a lot of impact or point load (think of high heel shoes, pianos, refrigerators, or pallet jacks) when installed correctly over a sound substrate. When the mortar isn't properly troweled, it creates unsupported space under the tiles which become weak spots that can be easily damaged by the same impact or heavy loads.
The best way to avoid these issues, avoid tile breakage, and create a strong tile assembly is to follow the following three steps.
Three Steps to Follow for Correctly Troweling Mortar on Your Tile Installation
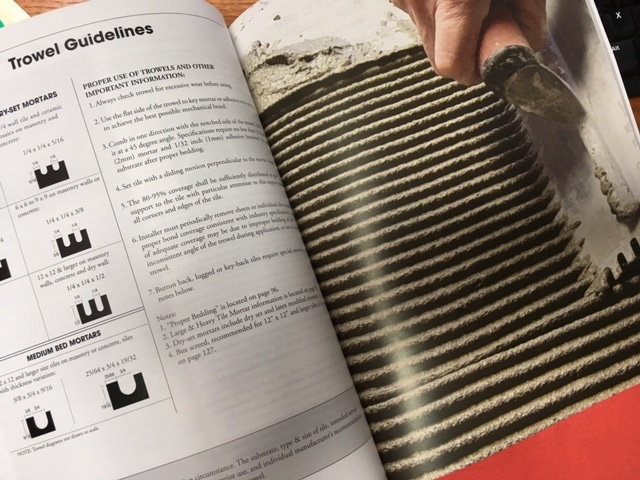
1. Select the right trowel type and notch size!
Make sure you select the appropriate trowel type and notch size.
- When a “v” notched trowel is used, the narrow point of the mortar does not provide the coverage necessary to properly support the tile.
- Using a notch that is too small will not allow enough mortar to be applied and likewise will not adequately support the tile.
>> See How To Select the Right Trowel Notch To Obtain the Required Mortar Coverage
2. Spread the mortar completely to the layout line!
Make sure to spread the mortar completely up to the layout line.
Installers who stay away from the chalk line to eliminate having mortar squeeze up in the grout joints leave dangerous voids which can result in catastrophic failure, especially in areas subject to high heels, point loads such as pallet jacks, pianos, or a refrigerator.
Follow established methods and best practices for installing ceramic tile to avoid long-term issues.
>> See Have You Snapped a Chalk Line for Your Tile Layout?
3. Trowel the mortar correctly by playing it straight!
Troweling mortar in one direction in a left-to-right direction, as seen in the National Tile Contractors Association Trowel & Error video (which you'll find at the end of this article) yields the best mortar coverage on the back of the tile. Place the tile into the mortar moving it in a back-and-forth motion perpendicular to the trowel ridges. This movement collapses the trowel ridges into the valleys leaving very few if any voids in the mortar which supports the entire back of the tile.
As the NTCA video explains, trowel ridges running in straight lines are much easier to collapse. Furthermore, they assist with air removal to maximize mortar coverage and ensure a strong bond to the tile and substrate.
- The first step is to “key in” a coat of mortar into the substrate for a good mechanical bond with the flat side of the trowel.
- Then, add more mortar to the substrate combing the mortar in straight lines, all going in one direction. Combing the trowel ridges in straight lines provides better distribution of the mortar.
- When installing rectangular (plank) tiles, the trowel ridges should go in the same direction as the short side of the tile. This allows better air release from under the tile since the air travels a much shorter distance when you bed the tile.
- Be careful not to leave any voids along chalk lines or between tiles.
- Use a trowel that will help you achieve a continuous minimum 3/32” coverage. Larger tiles most often require deeper trowels.
In the photo below, you can see that two adjacent tiles are broken with those pieces being much lower than the unbroken tile around them. The cause of the failure was multi-faceted. The installer did not spread the mortar with a recommended trowel, there was no mortar at the edge of the tile, and the installer was not qualified. The installer in this case had been placing tile for a grand total of three weeks.
Here's the tile installation problem you want to avoid.

Watch this video to learn how to correctly trowel mortar.
The 6:35 minute NTCA video titled Trowel and Error demonstrates how to correctly apply mortar as well as what happens when you don't. Doing it correctly creates a stronger bond between the tile and the substrate; it minimizes lippage, tile breakage, and other costly tile installation problems. It also means never using these failure-prone tricks:
- Spot bonding with mortar - which is not recommended to install tile. It may be easier to set tiles flat to each other during the installation, but it’s only a matter of time before just the slightest force causes a failure! Not to mention hollow-sounding tile. It means you can't get proper mortar coverage; air gets trapped with nowhere to go leaving the tile unsupported.
- Swirling the mortar - this causes voids where the tile is not bonded to the substrate. These voids can result in cracked tile and bond failure under normal use but especially under point load or impact.
Here's the video:
Bonus Tip: Don't forget to back-butter the tile!
For large format tile, glass tile, natural stone, or any tile set on exterior surfaces, “back buttering” the tile is recommended.
- Use the flat side of the trowel to get an even coat of mortar filling all the spaces in the surface of the tile.
- After keying in and spreading the mortar, set the tile firmly, moving it back and forth across the trowel ridges at least the same distance as the width of the trowel notch in each direction (e.g., 1/2"x1/2" trowels need the tile to be moved about one inch). Move the tile only in one direction, perpendicular to the ridges, without moving in the opposite direction or twisting the tile.
- When you first start setting and then periodically through the installation remove a tile checking for coverage.
- The ridges should be collapsed into the valleys. Neither the tile nor the substrate should be missing mortar. Straight trowel ridges collapse with the back-and-forth motion to eliminate voids, achieving a much stronger bond with complete mortar coverage.
- And remember - the larger the trowel, the more back-and-forth movement is needed.
>> See Back Buttering Tile: How Important Is It?
Questions from Readers about Troweling Mortar Correctly
Since publishing this article in 2016, we have received many questions that we answer below.
Thinset on the tile vs. the wall
In this section, we answer three questions.
Question 1
Can I apply the thinset directly to the tile or should it always be applied to the wall? I'm using a VersaBond polymer modified-LFT mortar. I'm putting 6x6 porcelain tiles on the wall inside the tub/shower area, 12x12 porcelain tiles outside of the tub/shower area, and 12x24 porcelain tiles on the floor. Thanks for your advice, Steve.
Steve, Thank you for your question.
Conventional thin set and large and heavy tile (LHT) mortars should always be keyed (mechanically forced) into the substrate, in your case, the tub/shower walls to promote a good bond. Applying the mortar to the back of the tile eliminates this crucial component of first-quality tile installations.
Additionally, the mortar should always be spread in one direction, either east to west or south to north. Place the tile into the freshly spread mortar, moving the tile back and forth in a perpendicular direction to the trowel ridges. This back-and-forth motion will collapse the ridges into the valleys as you can see in the Trowel and Error video above.
A tub/shower area is considered a wet area according to the TCNA Handbook which requires the mortar coverage to meet the required 95%.
Question 2
I am placing 12X12 ceramic mat tiles on the ceiling and surround of my bathtub. Using extra strength thin set with adhesive milk to help make it stay stronger on the ceiling. I have a 1/4 inch backer board (cement board) on the ceiling with screws every 2 inches. The walls have 1/2 inch cement board with screws every 3 inches in the studs. You told me to use straight lines with the thin set and then move the tiles across the ridges.
- Will it be best to butter the tile mat after putting the thin set on the cement board?
- How will I know when to apply the tile mats for the best adherence?
- Is there a way to test to be sure?
- Will it be better to use a support to hold the ceiling tile mats for overnight while the thin-set will cure?
I have experience as a brick mason and some floor covering but am not sure about this area. Not wishing to make any mistakes, in this delicate area, your advice will be greatly appreciated. Thank you, Bill
Bill, Thank you for your question which raises several very important requirements for tile installed on a ceiling, especially when installed in a wet area.
Always consult the mortar manufacturer to determine if adding a latex additive (adhesive milk) to the powered mortar is recommended. Adding the liquid latex to a latex-modified mortar can cause problems.
The wood framing of the ceiling must be nominal 2” x 4” and be spaced no more than 16” on center. All edges must also be supported which may require that blocking be added in between the joists or trusses.
According to the TCNA Handbook and ANSI Specifications, the backer board must be a minimum thickness of ½”, so the already installed ¼” backer board must be removed. The backer board should be fastened every 6” on center with corrosion-resistant 1-5/8” backer board screws which penetrate the wood framing a minimum of ¾”.
You said that the tile you are installing is a 12” x 12” mat which sounds as if this is a mosaic tile (mounted with a mesh or other backing). Tiles of this type are difficult to back butter. A better plan would be to clean the backer board with a damp sponge and key the mortar (physically force) the mortar into the backer board with the flat side of the trowel.
Try using a ¼” x ¼” x ¼” notched trowel to spread the mortar. Next, apply a small amount of mortar along the flat side of the trowel and move it perpendicularly to the ridges which will knock them down into the valleys creating a flat mortar surface. Properly align the sheet and beat it into place with a bearing block and rubber mallet. This mortar flattening action will minimize mortar squeeze up between the tiles.
If you install your mosaic tile with a better quality modified (latex) dry-set cement mortar which is recommended for installing this mosaic tile, there is no need to temporarily support the tile.
Question 3
Need never tiled before but was a stone mason year ago. I have a 6x36 wood plank porcelain tile can't get the thin set right I am using a 1/4 X1/4x3/8 and put down 3 rows a notice I was not smashing the thin set down did not know if it was the James Hardie board or sucking the thin-set dry or my thin set to stiff remove all cleanup tile did some reading on thin set tried again next trowel marks were not standing up well lay 3 rows again the same then I wet the board like only getting 10% coverage. Any ideas on how to fix this?
When the moisture in the thinset mortar is drawn out too quickly, the mortar can skin over or grow a crust on the surface of the mortar and will have little to no bond to the tile. Some backer boards are more absorptive than others and will require that they be dampened prior to spreading the mortar, especially in hot and dry environments. Conversely, other types of backer board will not allow any additional moisture to be added. Be careful and always read the manufacturer's instructions before starting your work.
It sounds as if your first mix was too dry and your second mix was too wet. Always read and carefully follow the directions on the bag which include measuring the amount of water added to the bucket before the powder is added.

What kind of trowel to use to play it straight
You'll find three more questions in this section.
Question 1
Great video. Any chance I can use a v-notch wood adhesive trowel in my mosaic tile installation?
The tile industry does not recommend using a v-notch trowel for tile installation since the high points of mortar do not provide adequate mortar to meet the industry mortar coverage requirement is 80% in dry areas and 95% in wet areas.
A better plan would be to clean the substrate with a damp sponge and key the mortar (physically force) the mortar into the surface with the flat side of the trowel.
Try using a ¼” x ¼” x ¼” notched trowel to spread the mortar. Next, apply a small amount of mortar along the flat side of the trowel and move it perpendicularly to the ridges which will knock them down into the valleys creating a flat mortar surface. Properly align the sheet and beat it into place with a bearing block and rubber mallet. This mortar flattening action will minimize mortar squeeze up between the tiles.
Question 2
My question concerns troweling sizes for my project. I am going to tile a 23ftsq entry with 3 tile sizes: 18" x 18", 12" x 12", and a mosaic border. The tile is porcelain. It's recommended to use 1/4" x 1/2" x 1/4" rounded for the 18" Large Format, 1/4" x 3/8" x 1/4" square for the 12" x 12", and 1/4" dragon tooth for the mosaic. It seems all the mortar elevations will differ if I strictly follow the trowel recommendations.
The trowel notch recommendations come from the tile and mortar manufacturers and are used as a general guideline for tile installation. This ideal plan would be to experiment with the three you have listed using a large and heavy tile (LHT) mortar. This mortar will allow the surface of the different tiles to be flush.
When installing the mosaic tile, use the same trowel to spread the mortar as was done for the other two tile sizes. Then apply a small amount of mortar along the flat side of the trowel and move it perpendicularly to the ridges which will knock them down into the valleys creating a flat mortar surface. Properly align the sheet and very carefully beat it into place with a bearing block and rubber mallet. This mortar flattening action will minimize mortar squeeze up between the tiles.
Question 3
I'm wondering if the 1/4" x 1/2" x 1/4" trowel will work for both the 18" and 12" main tiles and whether or not I can lay the border at a different time than the main tiles over a thin coat of fresh mortar sitting on the cured base coat of mortar that underlies and extends from the area covered by the main tiles?
I plan to use LFT medium set mortar for the entire job. The tiles will sit on a single sheet (no seams) of screwed-down 1/4" Hardie cement board, which itself will sit on a mortar bed over Redgard-treated OSB.
To determine if the trowel you selected will work effectively for both the 18” and 12” tiles, follow the techniques in the NTCA Trowel and Error video embedded above in this article.
I would not recommend installing the tiles at two separate times. Your best job will be achieved if you install both tiles at the same time. This way you can assure that there is no lippage, (one tile higher than the adjacent tile). There are numerous manufacturers that provide lippage control devices to aid in keeping the tile surfaces flat.

Collapsing and creating ridges
In this section, we answer two questions.
Question 1
When laying out the mortar and using the trowel, should you be going all the way down and removing the mortar to the floor when creating the ridges? If not, how do you keep an even depth?
The mortar should always be keyed (forced) into the substrate with the flat side of the trowel which allows a skim coat of mortar to remain. Add more mortar, and move the notched side of the trowel in one direction which creates straight mortar ridges.
It is not necessary to remove the mortar on the substrate under the trowel notches. In fact, it is better to allow this coating to remain. Therefore, do not press so hard that a grinding sound occurs.
Question 2
Great video and instructions. All makes sense to me but leaves me with one question.
I'm doing 12x24 tiles for a tub surround. I'm starting with the center; two full horizontal tiles and two cut pieces at each end. So what happens to the end tiles where there is no room to move the tile left & right perpendicular to the ridges? The end tiles are cut to fit the ends, so there is no room to move them and collapse the ridges.
The short answer is that you would change the direction of your troweled mortar.
As you have described your installation technique, you are troweling your mortar vertically (north and south) while moving the tiles left to right. If you change the direction of the troweling to horizontal (left to right), you would move the tile up and down, thereby eliminating the problem.
Ready to Trowel Mortar?
Are you ready to correctly trowel the mortar on your next tile installation job? Certified Tile Installers do.
The Tile Installation Experience with Scott Carothers at Coverings.
Let me know if you have questions.
Scott

Note: This article was originally published on June 7, 2016, tweaked in 2018, and further updated here.