

Have you encountered situations where a tile installation called for a 50% offset and credit card grout joints? And, then, once installed, did it lead to lippage problems, misaligned grout joints, and/or an unhappy customer?
I'm pleased to inform you that you can officially find guidance and justification for avoiding a 50% offset in the TCNA Handbook.
Ready to learn more?
What the Handbook Says About 50% or 33% Offset + Tight Grout Joints
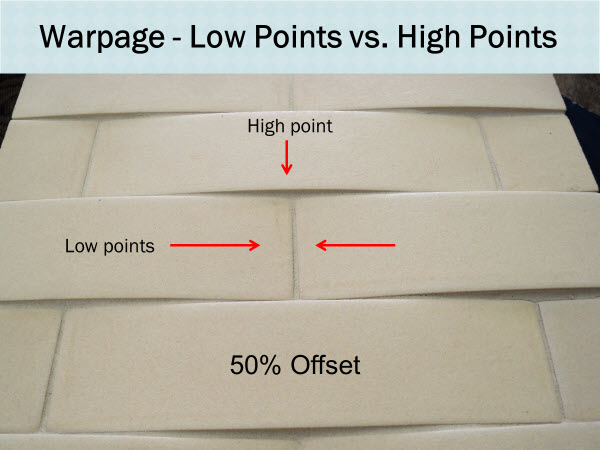
So much of the beauty and versatility of installed tile lies in being able to use patterns to create an interesting effect. With the popularity of rectangular tiles, the pattern of choice has been the 50% offset or brick joint. While this pattern can be very attractive, it can also be frustrating when the inherent warpage on the long side of the tile causes lippage.
This lippage issue, many times, leaves the installer with a difficult, if not impossible, task when a 50% offset with a credit card or 1/32” grout joint is specified.
>> See Are Credit Card Grout Joints Specified? First, Check Tile Industry Standards.
The problem occurs when the high point in the center of the long side of the tile is placed very tightly next to the two low points abutting the tile ends.
Now, both the ANSI Specifications and the TCNA Handbook include language that will help installers overcome the concern of tight grout joints and the offset pattern.
More specifically, here's what the Handbook states on the topic of this pattern, which is excerpted from the ANSI A108.02.
4.3.8.2 Running bond/brick joint and any offset patterns:
“For running bond/brick joint and any offset patterns (i.e., non-continuous grout joints) utilizing tiles (square and/or rectangular) where the side being offset is greater than 15” (nominal dimension), the offset pattern will be a maximum of 33% unless otherwise specified by the tile manufacturer. If an offset greater than 33% is specified, the specifier and owner must approve the mock-up and lippage.”
>> See Why a Tile Installation Mock-up is Really Necessary
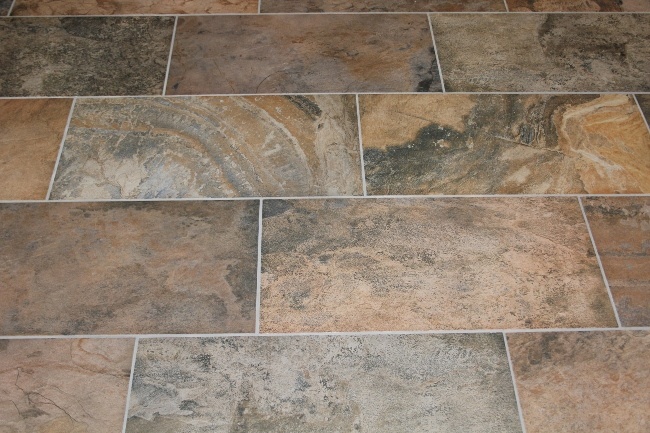
33% Offset Reduces Lippage
Moving the intersection of the two ends of the tiles to the 33% location (as you can see in the photo above) from the 50% location (as you can see in the image below) significantly reduces lippage and most times provides an acceptable appearance.
Many tile manufacturers now recommend that their products be installed with a 33% offset, which further supports tile mechanics’ need to install a tile pattern that will be satisfactory.
The Handbook language also gives the installer a method to overcome being responsible for the possible lippage by requiring the specifier and the owner to approve it before starting the Installation. This is a win-win situation for all involved.
The above photo illustrates the beauty and functionality of the 33% offset. Use this specification to your advantage. When a job calls for an offset installation, go for it, because now you have the support you need.
Running Bond Grout Joint Requirements
The other issue that is a crucial part of the successful offset pattern installation has to do with the size of the grout joint.
The ANSI A108.02 Installation Standard has a section devoted to specifying the size of the grout joint, particularly when one of the tile sides being installed is greater than 15”.
Before we begin this explanation, let's first define two types of tile that may be used:
- Rectified tile
- Calibrated tile
Is It Rectified Tile?
According to the ANSI A137.1 Ceramic Tile Standard, “Rectified Tile” is a tile that has had all edges mechanically finished to achieve a more precise facial dimension.
The size tolerance for rectified porcelain tile is slightly less than 1/16”.
Is It Calibrated Tile?
Calibrated tile refers to tile that has been sorted to meet a manufacturer’s stated caliber range. The size tolerance for calibrated porcelain tile is just over 5/32”.
As you can see, the rectified tile has a much tighter size tolerance than the calibrated tile. This allows an easier installation when minimum-sized grout joints are specified. With this knowledge in hand, the installer can use these ANSI requirements to his/her advantage.
ANSI A108.02.4.3.8.1 Running Bond/Brick Joint Patterns
To help installers deal with this issue, ANSI A108.02.4.3.8.1 Running Bond/Brick Joint Patterns states:
"For running bond/brick joint patterns utilizing tile (square or rectangular) with any side greater than 15”, the grout joint shall be, on average, a minimum of 1/8” wide for rectified tile and, on average, a minimum of 3/16” wide for calibrated (non-rectified) tiles.
The grout joint width shall be increased over the minimum requirement by the amount of edge warpage on the longest edge of the actual tiles being installed.
For example, for a rectified tile exhibiting 1/32” edge warpage on the longest edge, the minimum grout joint for a running bond/brick joint pattern will be 1/8” + 1/32” or 5/32” on average.
Of necessity, in any installation, some grout joints will be less and some more than the average minimum dimension to accommodate the specific tiles being installed."
With this language in place and knowing whether the tile being installed is rectified or calibrated, the installer now has a formula that will assist the architect, designer, or building owner in determining a grout joint size that will be both attractive and achievable.
Remember, always get written approval for the pattern being used and grout joint size, especially if edge warpage is an issue, BEFORE setting the tile.
To get this approval, you may have to provide an installed and grouted sample (a mock-up), which is time and money well spent.
What Are Your Customer's Offset and Grout Joint Expectations?
As you know, the beauty and long-term satisfaction with ceramic and porcelain tile installations often depend on the creativity of the design. Whether it's the owner, the architect, the designer, the retailer, or the installer who provides the pattern and layout suggestions, the end customer must be happy with the final appearance.
In other words, the installation has to meet your customer's expectations. That requires the installer to communicate installation methods and standards and gain agreement for what they imply for the final result.
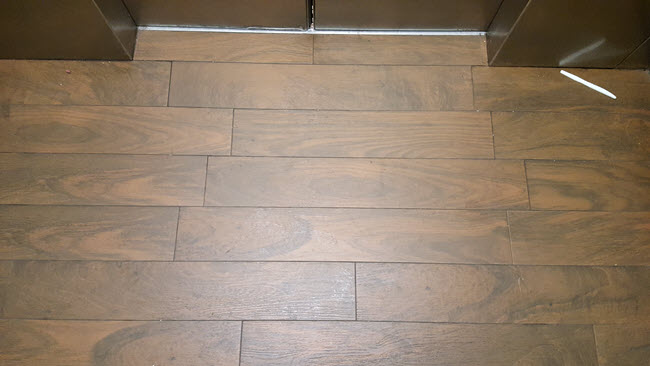
Installing Wood Look Tile: Think 33% Offset Max
When working with the popular woodgrain pattern tiles available, the installer and the owner will need to make choices as to the tile pattern and color, the grout joint offset, along with the grout joint size and color. Most of these wood-look tiles are planks that range from 3” up to 9” wide and lengths from 24” to 72” and beyond.
In other words, they are large format and will be subject to inherent warpage. That's why the ANSI Specification A108.02-4.3.8.2 recommends - as mentioned above - a maximum offset of 33%.
It also states the need for specifier and owner approval of a mock-up and lippage.
What About Random Grout Joints?
This language helps the installer by eliminating the 50% offset and its possible lippage. But what about a random grout joint? Almost all wood flooring is installed using a random (no pattern) end joint. Likewise, these tile installations may look more natural if installed randomly rather than in a regimented joint layout.
However, this option presents two challenges.
- If the planks are running in a random pattern, it's possible that offsets between 33% and 50% could occur and cause excessive and unacceptable lippage.
- Be certain customers know what pattern they have selected and how it will appear on the floor.
A Random Joint Plank Floor the Customer Rejected
Here's a recent situation I encountered.
The installer provided a beautifully installed random joint plank floor, which the customer rejected because the random pattern didn't meet her expectations. Those, by the way, had never been established between her and the installer.
The consumer did research and found that the ANSI Specifications call for a maximum 33% offset. She said her floor needed to follow the standard.
Ultimately, there was nothing wrong with the random pattern installation except that the customer (also the person paying the bill) would not accept it.
The bottom line - the customer is always right, so be sure to meet your customer's expectations by doing whatever is necessary to do so.
How Will You Next Deal with Offsets, Grout Joints, and Customer Expectations?
Are you confident in the advice the ANSI Standards and TCNA Handbook offer you? Will you create mockups for your next tile project and gain your customer's approval? I hope so.
The process demonstrates expertise and professionalism, not to mention respect for the project owner, something in which Certified Tile Installers take great pride.
>> See What's the Certified Tile Installer Program?
Scott
