
As a conscientious tile installer, do you take the time to protect bathroom fixtures before you start your installation?
Why Bother Protecting the Tub and Other Fixtures?
Realize that as a tile installation professional, you want to anticipate as much as possible before you begin your project, including protecting bathroom fixtures.
That holds true even if you are on a tight schedule, or you're called to get on the job quickly and complete the work in a short period of time. You must take precautions to protect the surroundings.
Why? Because when the project involves installing tile in a bathroom, whether it is new construction or a remodeling project, it may be the responsibility of the conscientious tile professional to protect the fixtures, especially the bathtub.
Fortunately, since you have ready access to a smartphone device with a camera, you can do so efficiently.
Before Starting Bathroom Tub Work, Take These Two Steps
So, what's involved in protecting bathtubs? Two critical steps:
Step 1: Inspect Closely
The first step in this process is to closely inspect the tub for manufacturing defects, chips, and scratches before the work is started.
Take photos, noting all possible issues.
If work is begun without notifying the owner of any of the above conditions, the installer may be responsible for the cost of repairing or possibly replacing the tub. You want to avoid such a situation.
Make this review process a “must-do” for each project.
Step 2: Notify the Owner or Builder in Writing
If any defects are found in the inspection process, the safest way to communicate this fact to the owner or builder is to always do so in writing.
A simple email noting these conditions is sufficient and ensures that the customer doesn’t contract convenient amnesia in the future and forget what was said.
How to Protect the Tub in a Tile Remodel
Protecting the tub can be done in one of several ways.
1. Cover the Tub with a Protective Layer
Start by damp wiping the surface to remove any construction dirt or grit.
Allow the surface to dry and cover it with a protective layer. This could be a clean heavy-duty drop cloth or a furniture pad that conforms to the tub shape and is taped to the tub edge to keep debris from getting underneath.
2. Use a Heavy-duty Cardboard Unit
There are also manufacturer-produced options that are made specifically for this purpose.
Heavy-duty cardboard units cover the entire tub from wall to wall as well as the front face. Many times these products can be salvaged and reused on your next job.
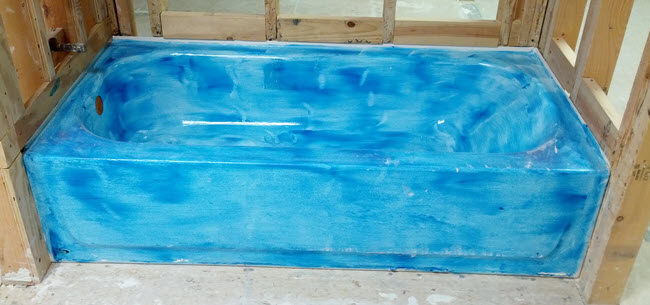
3. Try a Liquid Coating
Liquid coatings also offer protection from thin-set mortars and grouts.
These products are applied by spray, roller, or brush and are allowed to dry to provide a tough finish as shown in the photo above.
In order to protect the non-slip surface on the bottom of the tub, rub a bar of soap over these areas. This will prevent the coating from bonding and will facilitate removal. Once the installation is completed, the coating is simply peeled away and discarded.

Still Wondering About Tub Protection?
The use of tub protection is not only a common sense and potentially money-saving choice, but it builds consumer confidence beyond expectation by demonstrating concern for the customer’s property.
Consider it the equivalent of "an ounce of protection" and in the same category as other topics I've addressed, such as:
Consider learning more about the Certified Tile Installer program and the professionalism associated with becoming Qualified Labor.
If you have questions about how to (and why) protect the tub in a bathroom tile remodel, let us know in the comments.
Thanks for reading and please tell your friends where you found this information.
Scott

Note: We originally published this article on 11/13/2018, and have updated it.