

If you understand that all tile assemblies move and that movement (expansion) joints are mandatory, you also know that they are the only way to ensure success.
However, do you think installing movement (expansion) joints in tile installations is a pain in the #?&? If so, here are two quick and easy ways to install high-quality and long-lasting movement joints.
After all, it's really important that you do so to avoid tile installation failures. But statements such as:
- Movement joints never work
- They always require a callback to redo them
- Your installers refuse to use 100% silicone sealant
Issue 1: Movement Joints Don't Work
The issue of the movement joints not working occurs when the wrong products or techniques are being used.
When you use lower quality “caulking” products such as acrylic latex or siliconized latex in tile work, they dry hard, shrink, and many times fall out when movement occurs in the structure.
Due to their inability to remain flexible, you'll notice an unsightly crack develop between the backsplash tile and the countertop or the wall tile and the bathtub.
Issue 2: Callbacks From the Builder
Now there is a callback from the builder (if the new house has not yet closed) or from the consumer soon after they move in.
After listening to the complaint and writing down the details, someone must go to the site as soon as possible to fix the problem. The installer needs to rake out the “old” caulking, vacuum out the debris, and install the new caulking.
Unfortunately, the installer sent to replace the caulking uses the same product that failed the first time. That is Einstein’s definition of insanity;
“Doing the same thing over and over again and expecting different results.”
If it failed the first time, it will probably do the same the second time and the third time.
Issue 3: Use the Right Product for Movement Joints!
The cure for this problem is to use the correct “sealant” not caulking. The TCNA Handbook and the ANSI Specifications under section A108.01-3.7.4.1.1 state,
“Suitable sealants include silicone, urethane, and polysulfide.”
You will notice that this list does not include acrylic latex or siliconized latex caulking products.
If your installers refuse to use 100% silicone sealant because they are sticky, messy, hard to use, or smear onto the face of the tile, perhaps it's because they were never shown the correct method for installing them.
By the way, this article also explains in detail why you need movement joints:
Two Quick & Easy Movement Joint Solutions
There are two ways this may be done.
Method #1 for High-Quality Movement Joints
The first method is as follows:
- Install the appropriate-sized foam backer rod into the joint
- Apply painter’s tape along the edges of the tiles along the joint
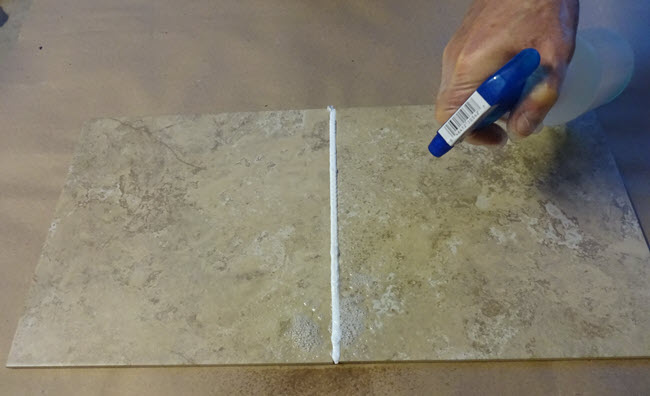
- Fill the joint with 100% silicone
- Smooth it with a sealant tool or even a plastic spoon
- Remove the tape by pulling it on an angle toward the joint as soon as the joint is complete.
In fact, this is something that Certified Tile Installers have to complete successfully during their hands-on test.
Below, you see me checking the inside corner of a wall to determine if the expansion joint was properly installed. These expansion joints provide the ability for movement to occur between wall-to-wall and floor-to-wall applications.

Method #2 for Movement Joints
The second and easiest method involves the following:
- Fill the joint with the appropriate foam backer rod
- Fill the joint with 100% silicone sealant (no need for tape)
- Then spray the sealant and the face of the tile with a mixture of water and dish detergent.
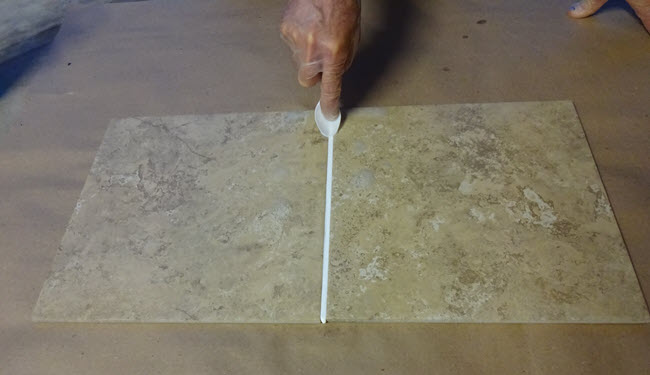
The smoothing tool or plastic spoon are also sprayed with dish detergent solution allowing the excess sealant to be easily removed without the worry of it sticking to or smearing on the face of the tile.
Depending on the type of joint specified, the profile of the smoothing tool can provide a joint that is either concave or flat.
When I conduct demonstrations on the proper installation of sealant joints, I often hear this statement,
“It can’t be that easy.”
It really is that easy. Using this technique will save time, eliminate costly callbacks, make your installers happy, and yield happy customers.
Sometimes something so simple can provide huge rewards.
Ready to Commit to Always Installing Movement Joints and Doing Them the Right Way?
Let us know which of these two methods you prefer.
If I've not made the point about how critical expansion or movement joints are to ceramic tile installation, please let me know in the comment box below.
If you're still wondering, consider learning more about the Certified Tile Installer program.
Thanks for reading and please tell your friends where you found this information.
