

Is the mortar coverage under the tile you install important? You bet. Do you just assume that you are getting sufficient coverage? I hope not.
As often as mortar coverage comes up in articles about tile installation, you'd think that the problem would go away. Unfortunately, it hasn’t, especially in exterior and shower areas, for natural stone tile, and even high-profile commercial installations.
If you want your tile installation to function as it should, don't assume you have sufficient mortar coverage. Check it. That's the best way to avoid costly callbacks and ensure a successful installation
You can also listen to this article:
Natural Stone Tile Requires 95% Mortar Coverage
The amount of mortar (or the lack of it) placed under a tile is a strong indicator of whether it will function well or become a time-wasting and potentially expensive callback. This is especially true for natural stone tile.
The ANSI Specifications under A108.5 section 3.3.2 (page 38 in the November 2017 edition) state the following:
The average uniform contact area shall be not less than 80% except on exterior or shower installations where the contact area shall be 95% when no less than three tiles or tile assemblies are removed for inspection. The 80% or 95% coverage shall be sufficiently distributed to give full support to the tile with particular attention to this support under all corners of the tile.
The TCNA Handbook (page 35 of the 2018 edition) lists this above information in a shorter version and goes on to list the following statement for stone tile.
Mortar Coverage for Natural Stone Tile: Mortar coverage must be sufficient to prevent cracks in the stone resulting from voids in the setting bed. In dry and wet areas, the minimum coverage is 95% with no voids exceeding 2 square inches and no voids within 2” of the tile corners. All corners and edges of the stone tiles must be fully supported and back-parging or back-buttering is recommended in all areas. Coating the back of the tile, however, does not constitute coverage, which is the area where the mortar makes contact with the tile and the substrate.
These two statements are tile industry requirements for the proper installation of tile. However, due to the fact that most stone tiles are not as strong as a ceramic or porcelain tile, it is even more important that all areas on the back of the stone tile are covered with mortar and fully supported.
The straight line troweling method found in the NTCA (National Tile Contractors Association) “Trowel and Error” video shows the mortar being keyed into the substrate with the flat side of the trowel and then combed with the notched trowel in a left to right direction. The tile is then pressed into the mortar and moved in the opposite direction to the notches which collapses the mortar ridges normally provides the required coverage.
To be certain the proper coverage is being obtained, occasionally remove a tile to verify that an adequate amount of mortar is present.
>> See How to Correctly Trowel Mortar When Installing Tile
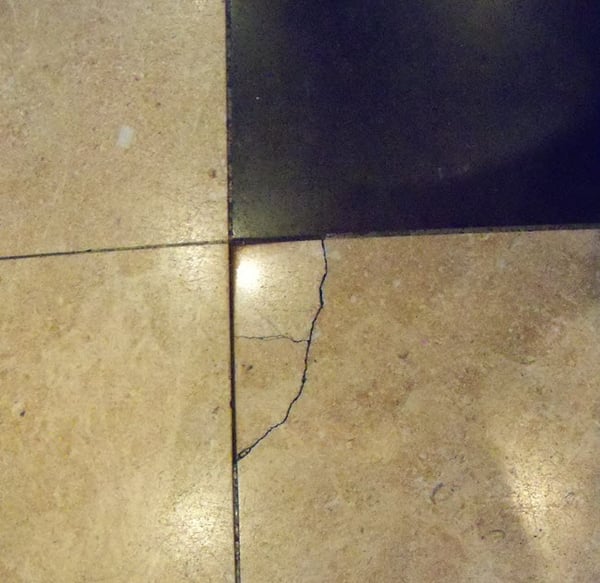
The photo below, unfortunately, shows the result of insufficient mortar, a costly callback.
Let's Talk About Mortar Coverage for the Wall
As bad as insufficient mortar coverage is for stone tile and floors, imagine the callback you'll have if wall tile fails. Once installed, a wall tile must be removed to check coverage. Assuming coverage is there just isn't good enough. You need to check it periodically.
Which Trowel or Notch Ensures Sufficient Coverage?
Many times I'll hear the question, “Whose trowel should I buy or what notch is best for the wall?”
It's not possible or feasible to say that one trowel brand or a specific notch will provide enough mortar to supply the required coverage in every application. The condition of the substrate and the back of the tile dictate how much mortar is required.
>> See How To Select the Right Trowel Notch To Obtain the Required Mortar Coverage
The ANSI Specifications contain mortar coverage listings for each type of tile:
- A108.5 section 2.3.4, Setting glazed wall tile (semi-vitreous and non-vitreous);
- A108.5 section 2.4.3, Setting ceramic mosaic tile;
- A108.5 section 2.5.3, Setting quarry tile, paver tile, and other unmounted vitreous and impervious tile;
- A108,5 section 3.3.2, Setting floor tile.
“Average contact area shall be not less than 80% except on exterior or shower installations where contact area shall be 95% when not less than three tiles or tile assemblies are removed for inspection. The 80% or 95% coverage shall be sufficiently distributed to give full support of the tile.”
Knowing that shower or wet areas require 95% coverage, installers need to meet the challenge. The best way this can be achieved is to experiment with various trowel notches and configurations until the coverage requirement is met. If not achieved, back-buttering the tile may be necessary.
>> See Back Buttering Tile: How Important Is It?
Additionally, the condition of the substrate and pattern on the back of the tile are factors that affect the ultimate coverage. Once installed, a tile should be removed randomly to check coverage. Assuming coverage is adequate is not good enough. You need to check it out.
You Need to Experiment With Trowel Notches and Configurations
Knowing that the 80% and 95% guidelines are in place, installers need to meet the challenge and obtain the coverage. The only way this can be achieved is to experiment on each new installation with various trowel notches and configurations until the coverage requirement is met.
Many coverage failures occur when the choice is made to use a smaller notch to eliminate the mortar squeeze up between the tiles. This is a fatal mistake because coverage is sacrificed and there isn’t enough mortar to properly bond the tile to the substrate, let alone meet the ANSI requirement.
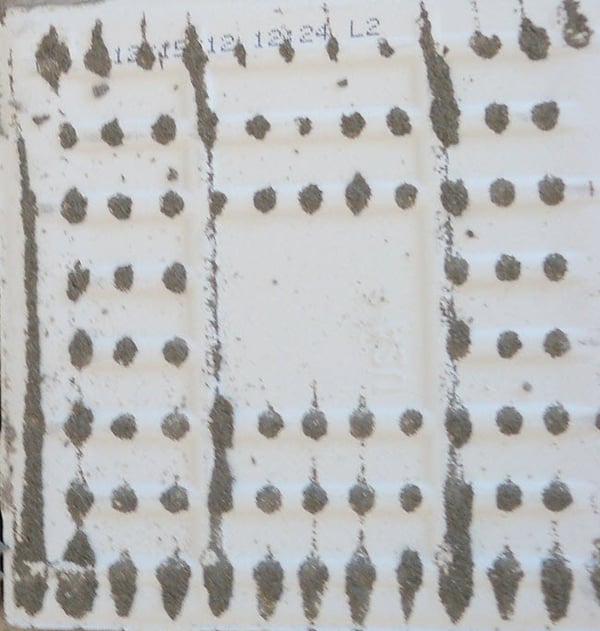
As seen in the above photo, mortar coverage is almost non-existent. The gray mortar barely "dots" the raised grid pattern on the back and nothing touched the body of the tile. This installation didn’t have any squeeze-up, but it also didn’t have any coverage.
The ironic part of this installation is that on the surface, the tile job “looked” fantastic. The grout joints were consistently sized, the cuts were very neat and there was virtually no
So what’s the problem? It had no coverage. This job would be fortunate at best if the tile remained on the wall. Better quality tile work installed by Qualified Labor needs both coverage and good looks.
Insufficient Mortar Coverage Affects Shower Grout
Having insufficient mortar coverage can also lead to shower grout being light and dark.
How often have you encountered this scenario? The shower installation is complete, looks great and the installer is waiting for final payment. Before making this payment, the customer wants to try out the new tile job and uses the shower. All is well until the grout joints don’t dry out equally and are different shades of light and dark.
The consumer determines that the grout must be defective and requires the installer to come back to replace the dark-colored grout which should eliminate the problem. The installer
Well, not really.
The owner then uses the "fixed" shower and the defective grout is back.
The cause of this phenomenon is, for the most part, due to the lack of full mortar coverage on the back edges of the wall tile. The ANSI Specifications for setting glazed wall tile (semi-vitreous and non-vitreous) ANSI A108.5 section 2.3.5 states,
“If 95% coverage is specified in the project specifications, back butter each tile with
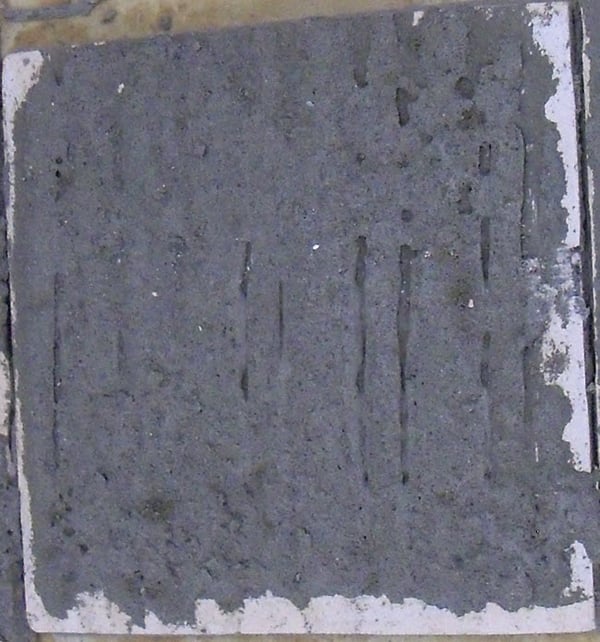
In essence, this statement requires 95% (or more) mortar coverage with no edge voids. As you can see in the attached photo, the installer had almost full coverage on the body of the tile, but three edges were not covered. As the shower is used, water seeps through the grout joints and into this open void. This stored water keeps the grout joint moist (and darker) for several days until the water is evaporated.
Unfortunately, there is no way to fix this problem except removal and replacement. Wet area tile work must not have these open voids. Get the proper coverage and life is good.
Are You Still Willing to Assume You Have Sufficient Mortar Coverage?
Or, will you consistently check for coverage?
If you haven't already, consider becoming a Certified Tile Installer (CTI). As a CTI, you set yourself apart from the crowd and know how to anticipate tile installation problems before they occur. Do it right the first time and get paid accordingly.
If you need additional reasons to do so, read Why Should You Take the CTI Test? Contractors Respond.
Thanks for reading.

Note: We originally published this article on 12/04/2018, and have updated it.