

What Do You Use to Patch Your Substrate so It Is Ready for Tile?
You've surely been in the position as a tile installer to deal with job site conditions that require the substrate (floors and walls) to be patched making it “tile ready”. No question, it's critical to get the substrate flat enough to accommodate tile. This is particularly true if the tile is large format.
>> See Is Your Floor or Wall Flat Enough for Large Format Tile
The bigger question is what should you use to fix the irregularities you've encountered? Do you use patch or thin set? I hope your answer is not thin-set.
The Goal of Substrate Prep: A Flat Surface
Before going into detail about what to use, let's start with what the benefits of proper substrate preparation.
Ultimately, the goal is to achieve a flat surface. In the tile world, the word “flat” means that the surface substrate does not have any significant high or low spots and which will yield a smooth tile installation with no lippage between tile edges.
Flat means no significant high or low spots.
This is true whether you're working on floors or walls.
Lippage on Floors and Walls
Ultimately, you want to achieve a surface flat enough, so lippage isn't an issue on the floors and wall wash lighting issues are non-existent on the walls. Yes, flatness matters for walls.
>> See How Not to Install Tile on Floors, Walls, and in Showers
>> See Have You Adequately Prepped the Substrate for Tile?
>> See How to Evaluate a Finished Tile Installation
Determining Floor or Wall Flatness
If you aren't sure how to deal with flatness, here's how to get started.
Find out if there's an issue.
Determining the flatness of the floor or wall is relatively easy by using a ten-foot straightedge or the longest straightedge the tile area will accommodate.
Simply mark the substrate with some method such as circling the low spots and placing an X on the high spots to quickly show where work is needed to meet the ANSI specification.
Addressing Surface Flatness
To ensure surface flatness for your tile installation, you have two approaches:
- Grind down the high spots to meet the surrounding surface. Be extremely careful not to spread a layer of dust over the entire room or building. Make certain that you know and understand the recently adopted OSHA (Occupational Safety and Health Administration) guidelines which do not allow open grinding. All grinding equipment must be fitted with the appropriate bonnet to capture the dust and direct it to the attached and approved HEPA filter vacuum.
- Make the low areas flat by filling them with the appropriate product. That product is not thin set.
Essentially, you want to use either a cementitious patching compound for the small areas or a self-leveling underlayment (SLU) with the recommended primer (provided by the same manufacturer) to fill the low spots and provide a flat surface.
This will normally provide a surface that will be suitable for installing tile within the prescribed tolerances.
Troweled-On Floor Patch for Low Areas
For low areas, consider using a troweled-on floor patch.
Floor patch materials come from a variety of manufacturers and are used to obtain the required plane for tile installations. This includes filling cracks, voids, rough surfaces, and low or depressed areas.
Most of these products are latex-modified and require mixing with potable water. These patch products are designed to tenaciously bond to the properly prepared surface and fill low areas, also known as bird baths, as well as flatten out high spots.
Or Self-Leveling Underlayment
If the job site conditions require the surface to be flattened, a self-leveling underlayment product mixed and applied according to the manufacturer’s instructions can yield successful results.
This entire exercise is the best way to “fix the floor or wall.”
>> See The Ultimate Guide to Underlayment for Tile
Avoid Thin Set at all Costs!
Many times, unfortunately, the patch material ends up being whatever is leftover in the truck, usually a thin set mortar. Avoid using thin set mortar as a patch at all costs!
As its name indicates, thin set mortar is the bonding mortar used to attach the tile to the substrate. Nowhere in that name do you find the word patch, fix, flatten, or repair and herein lies the problem. Using thin set to fill low areas by applying it a little thicker (most times it is much thicker) as the tile is being installed, is not a good idea.
In fact, most manufacturers indicate in their product literature NOT to use thin set mortar to level or flatten the floor or wall.
Thin Set is Not Meant to be a Filler
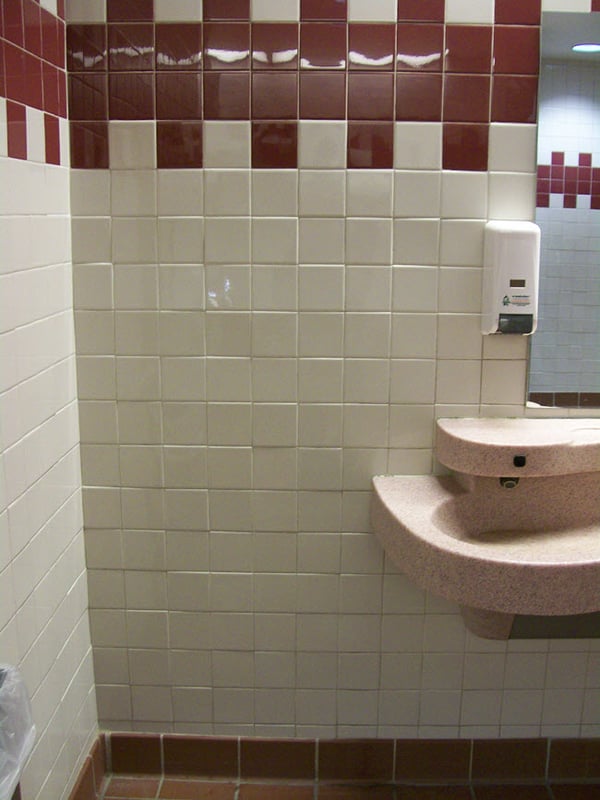
The reason manufacturers caution installers against this practice is that thin set mortar was never designed to be used to fill in low areas. When used as filler, especially when it is thicker than the recommended thickness after the tile is embedded, the mortar can shrink at different rates during its curing process.
When this occurs, some of the tile surfaces that looked perfect when installed will look extremely irregular in a couple of days as evidenced in the photo above. The installer tried to use thin set mortar in a heavier-than-recommended application to “level out” the concrete block wall and as you can see, it didn’t work.
Don't Patch Your Tile Substrate with Thin Set
Let's recap.
If you're in a situation where you must prepare the substrate so it is tile ready, what will be your product of choice?
I hope you'll never use thin-set or large and heavy tile (formerly medium bed) mortars to fix the floor or wall substrate, whether it requires filling the low spots or feathering out the high points in the floor.
Your best choice will be the proper flash patch or self-leveling underlayment (with primer) to make these corrections. When repairing walls, a good-quality flash patch should work well.
If you have any questions, please do not hesitate to contact us.
Thanks for reading.

Note: We originally published this article on 05/07/2019, and have updated it.