

How well do you prep substrate for tile? Do you take the time to check it out before you start installing tile?
The quality of the tile work that the consumer sees on the surface is only as good as what is underneath. This seems to be a simple statement, but if the appropriate prep work is not completed, the final appearance may not be acceptable, not to mention that it may lead to failure.
In other words, as installers, you and I must adequately prepare the substrate for tile. Otherwise, you may not get paid.
Ensuring the Substrate is 'Tile Ready'
On most jobs the substrate (whether it be wall or floor) is supposed to be “tile ready when the installer arrives.” But as most of us know, it isn't.
According to The Top Ten Requirements for a Quality Tile Installation, in order to provide a flat ceramic or stone tile installation, carpenters, masons, concrete finishers and other trades must meet the tile industry standards for flatness tolerances.
And, if substandard surfaces are encountered, these problems must be corrected before installation begins. Otherwise, you will not have a quality tile installation.
>> See Is Your Floor or Wall Flat Enough for Large Format Tile?
It's that simple... or maybe not.
This means that you must review the jobsite conditions before starting work to determine what needs to be done and who will pay to make it right if the substrate is indeed not tile ready.
At this point, be sure that you have a signed change order in hand from the general contractor, project manager, or home owner before proceeding. This way, at the end of the job, the installer gets paid for all the extra work that has been done to ensure tile readiness and a successful installation.
Three Critical Situations Where a "Tile Ready" Surface Really Matters
Perhaps you've encountered these specific situations where prepping the substrate for tile truly matters:
- Paint on the Substrate
- Tiling over a concrete block wall
- Tile and "wall wash lighting"
Let's explore each in turn.
1. Paint on the substrate
Here's why it's important to ensure your substrate has no paint or other contaminants on it: contaminants prevent mortar and tile from properly adhering to the surface and leading to failure.
A frequent scenario
All too often, the jobsite visit will reveal that the concrete floor now has an off-white or light beige-colored primer residue on almost the entire floor from the careless painter coating the ceiling. The spray-applied primer that does not adhere to the drywall is “designed” to be completely dry before it falls to the floor, which allows it to be swept away easily.
However, any installer who has been on a construction site knows that this is not the case. That paint is now well bonded to the concrete and normally is not able to be removed with a six-inch flat blade or a razor scraper.
True, this mess should never have occurred in the first place. The painter should have placed a drop cloth on the floor, pausing briefly to move it as needed. Unfortunately, this seldom happens.
Decision-time: tile over or delay the schedule?
The tile installer now has to make a decision; accept the floor as is and tile over it (remember, you tile it, you own it) or write emails to all the interested parties which may delay the schedule causing unhappiness to the general contractor.
Without question, the paint should be removed. Unfortunately, push comes to shove and the tile installer is going to start right away. His or her only way to get a good bond to the painted surface is to buy the mortar manufacturer's “super sticky stuff” and get it done.
Yikes - hollow-sounding tile!
The job is complete. Everyone is paid and life is good…..until the owner calls saying,
“WE have hollow-sounding tile which is not acceptable.”
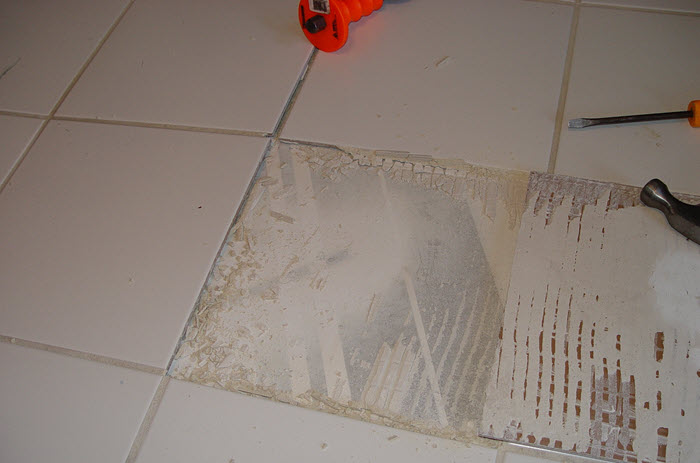
A quick trip to the jobsite reveals just that, hollow-sounding tile. Now it’s time to call the mortar manufacturer since the thinset didn’t bond to the floor. When the mortar rep arrives, a tile is removed, as seen in the photo above, showing the tile with thinset mortar well bonded to the back.
Interestingly, some of the paint is well bonded to the thinset and some of the residue is still on the concrete.
Reality check: the installer is at fault :(
Now comes the reality check; the installer is at fault (Remember, the paint should have been removed).
The thinset manufacturer is in the clear. The product used did what it was designed to do, bond the tile to the surface beneath.
Unfortunately, it is the paint, not the concrete. The last time we checked, paint manufacturers don’t warrant their products as a bonding agent for thinset mortar.
2. Tiling over a concrete block wall
Many times tile is specified to be installed on walls made of concrete block.
Even if the block mason did a really good job, the wall may have high and low spots that need attention. However, if the mason was not as skilled, the prep work required can increase significantly.
Either way, the surface must be flattened in order to produce a quality tile installation. With the vast array of patch products on the market, correcting these problems can be easily accomplished in a relatively short period of time. And once the surface is flat, installing the tile is much easier and faster.
The Ultimate Guide to Underlayment for Tile describes floor patch products as follows,
Floor patch materials come from a variety of manufacturers and are used to obtain the required plane for tile installations. This includes filling cracks, voids, rough surfaces, low or depressed areas (also known as bird baths) as well as feathering out high spots.
Most of these products are latex-modified, require mixing with potable water and are designed to tenaciously bond to the properly prepared surface.
This entire process is the best way to “fix the floor or wall.”
3. Tile and "wall wash lighting"
Another factor that can turn what appears to be an acceptable wall tile installation over a concrete block into one that is not acceptable is known as “wall wash lighting.”
This occurs when the light fixtures are placed directly along the wall or very close to the wall. The light shining across the wall surface can create shadows on any part of the wall that is not completely flat.
As seen in the photo below, the lighting casts a shadow on the tiles that are not in line with the ones around it.
.jpg?width=638&name=Fix%20It%20or%20You%20May%20Not%20Get%20Paid%20(638x850).jpg "If wall wash lighting is specified, submit a written request to the architect asking that the light fixtures be moved away from the wall at least 24”")
This situation is not acceptable and most times will require the work to be removed and replaced.
>> See Three Lippage Hazards to Avoid
Prepping the Substrate for Tile Recap
Remember these tips prior to starting work.
- Review the jobsite conditions and find out what needs to be fixed
- Submit your price for the work in a written change order and get signed and dated approval
- Fix or flatten the surface so it is tile-ready
- Request that the permanent lighting be installed before the tile work begins
- If wall wash lighting is specified, submit a written request to the architect asking that the light fixtures be moved away from the wall at least 24”
- Install the tile and get paid for the quality you provide
If you need tile installation resources, be sure to check out these blog posts:
>> How to Correctly Trowel Mortar When Installing Tile?
>> Why a Tile Installation Mockup is Really Necessary
>> The Tile Installation Experience with Scott Carothers at Coverings.
And, here's an example of someone who had to do a lot of fixing,
>> See How Not to Install Tile on Floors, Walls and in Showers
Have You Fully Prepared Your Substrate for Tile?
What did you find when you checked your substrate? And, how did you address it?
If you find the surface contaminated in any way, you must notify the architect, general contractor, and/or the owner of this condition by letter or email.
Stick to your guns and get paid (as you should) to fix or clean the floor before the job begins. Otherwise, the cost of the callback and the replacement tile work comes out of the installer’s pocket. It's a lose, lose situation no matter how you spread it.
Fix it or you may not get paid. It's that simple.
Thanks for reading.
Scott

Note: We originally published this article on August 8, 2017, and have updated it.