If you think that warped tile isn't acceptable, we're here to help you understand what is and what isn't acceptable. You see, there are two categories to consider: inherent (actual) warpage and excessive warpage.
Actual warpage is a function of the tile manufacturing process. It's something qualified tile installers and Certified Tile Installers take into consideration.
Excessive warpage may indicate a bigger issue.
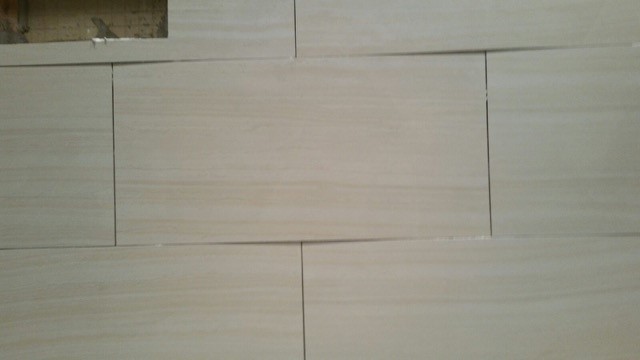
Whether you have actual or excessive warpage, you'll want to follow the best tile installation practices so you don't encounter a situation such as the one in the image above, where a 12" x 24" tile set at a 50% offset exhibits excessive warpage!
Former National Tile Contractors Association (NTCA) Technical Trainer and Certified Tile Installer #1112 Mark Heinlein describes those best practices in this article.
Inherent Tile Warpage
ANSI A137.1 is the American National Standard Specification for the manufacturing process of Ceramic Tile in the United States.
Tile manufactured following this standard meets minimum and maximum criteria in many areas, including warpage measured along the edge of the tile and diagonally from corner to corner.
For a Pressed Floor Tile, the specifications for warpage vary depending on whether the tile in question is natural, calibrated, or rectified. If your tile is a Pressed Floor Tile (this does not include porcelain), the maximum allowable edge warpage is limited to the following (the minus and plus means the tile could be warped downward or upward):
- Natural: -0.12" to +0.12”
- Calibrated: -0.08” to +0.08”
- Rectified: -0.05” to + 0.05”
Keep in mind that with tiles becoming larger and longer, they proportionately can include more actual or inherent warpage.
>> See Do You Have Enough Mortar to Accommodate Most Tile Warpage?
Excessive Tile Warpage
For example, a 5" x 22" ceramic tile that exhibits 3/16” of warpage, which converts to 0.1875”, demonstrates more than the maximum allowable edge warpage for all types of Pressed Floor Tile. (Note: Allowable diagonal warpage may be slightly more.)
If you encounter a similar situation, your next step is to find out if your tile was manufactured to meet the specifications of ANSI A137.1.
Check the tile carton; if it isn't stamped with information indicating that it meets A137.1, contact the manufacturer or distributor. They will be able to tell you whether the tile meets ANSI A137.1.
How to Deal with Tile Warpage
Qualified tile installers look to ANSI A108, the American National Standard Specifications for the Installation of Ceramic Tile, for guidance. When it comes to dealing with tile warpage, ANSI A108.02 4.3.8.2 states:
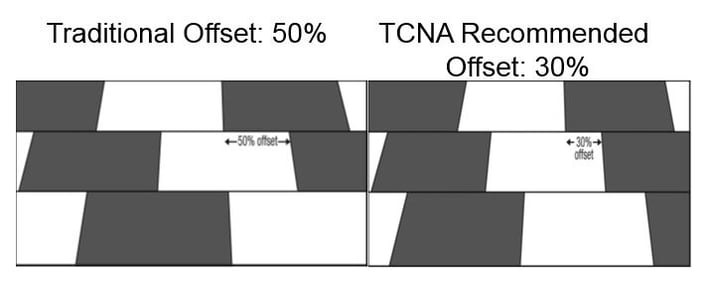
“For running bond/brick joint patterns utilizing tiles (square or rectangular) where the side being offset is greater than 18 in. (nominal dimension), the running bond offset will be a maximum of 33% unless otherwise specified by the tile manufacturer. If an offset greater than 33% is specified, the specifier and owner must approve the mock-up and lippage."
>> See ANSI Standards: A Tile Installer's Best Friend!

33% Offset Pattern
Note that the offset specified in the ANSI standard is not a 50% offset. The reason is that this pattern amplifies actual tile warpage and likely results in unacceptable lippage in the finished installation.
In other words, the tile should be set in a 33% offset pattern unless the manufacturer specifies an even smaller offset (e.g., 25% offset).
In addition, the grout joint size should be widened to help lessen the effects of lippage caused by actual warpage in the installation. ANSI A108.02 4.3.7 discusses criteria for lippage, which includes allowances for workmanship.
Test Another Offset with a Mockup
If you have your heart set on a subway tile set at a 50% offset, try what the ANSI standard specifies: a mockup, which is a sample installation of the tile set at 50%.
If you love the way it looks, approve the mockup by signing and dating it. Save the mockup and/or take a photograph that both you and your installer can add to the permanent record of the installation.
If you don’t like the 50% offset, try a smaller offset until it is acceptable. Make certain the grout joint width is also part of the mockup and consideration.
>> See Why a Tile Installation Mockup is Really Necessary
Find a Different Tile
Another option is to find a different tile, preferably one manufactured to meet ANSI A137.1.
Use Lippage Control Devices
You'll find many lippage control devices on the market that may assist in flattening the installation.
>> See Three Lippage Hazards to Avoid
Don't Underestimate the Importance of Substrate Flatness!
Substrate flatness will also be critical for your installation.
For a 22” long tile, the substrate must meet the required flatness tolerance of no more than 1/8” in 10’. If it does not, additional material and labor must be factored into the installation to make the substrate acceptable (flat enough) for tile of this size.
>> See Is Your Floor or Wall Flat Enough for Large Format Tile?
>> See Do You Have Enough Mortar to Accommodate Tile Warpage?
Learn How to Deal with Tile Warpage
If you haven't already, consider becoming a Certified Tile Installer so you can learn these best practices, ask the right questions, and anticipate tile installation issues before they occur.
Note: We originally published this article on 04/04/2017 and have updated it.

