.jpg?width=600&name=NKBA-Scott-Presentation%20(1).jpg) Have you wondered what goes into specifying ceramic tile, stone and glass for kitchen and bath installations - especially if you want those installations to be successful? That's what Scott Carothers focused on in his NKBA presentation, using stunning installation examples.
Have you wondered what goes into specifying ceramic tile, stone and glass for kitchen and bath installations - especially if you want those installations to be successful? That's what Scott Carothers focused on in his NKBA presentation, using stunning installation examples.
Here's a summary with highlights and the actual presentation included at the end of the article.
>> See Qualified Labor Matters to Kitchen and Bath Design: NKBA Webinar Series
Specifying Ceramic Tile, Stone & Glass for Kitchen & Bath Installations That Work
Did You Know This About Scott Carothers?
To put into perspective the value of this presentation, realize that Scott Carothers was a retailer for 27 years in Central Pennsylvania where he sold, designed and installed ceramic tile products.
He joined CTEF in 2007. In his role as Director of Certification and Training, his first task was to create the Certified Tile Installer (CTI) program which launched in 2008. That, in turn, led to the Advanced Certifications for Tile Installers (ACT) program which Scott co-authored and launched in 2013 at the Covering Show in Atlanta.
And, he is a voting member of the Tile Council of North America Handbook Committee and the ANSI A108 Committee.
Why Proper Tile Installation Matters for Kitchen and Bath Installations
In this presentation, Scott identifies the areas of kitchen and bath where specifying tile is so critical if it is to be done correctly. After all, tile is a fabulous finish. However, if it isn't done correctly both in the specification end and the installation, it can be a major debacle.
That's why it's important to identify key considerations for specifying a proper tile installation in the kitchen and bath, and understand the characteristics of tile, stone, and glass and where to use them. They cannot be used interchangeably.
Finally, know that hiring Qualified Labor is essential to success. You'll find wording in the TCNA Handbook about this as well as in the Master Spec.
Tip 1: Managing Client Expectations for Tile Installations
The reason for needing to understand product characteristics and installation implications has to do with what's possible now with tile and client expectations. You'll find larger and longer tile sizes, and you'll need to ensure that clients have realistic expectations about them for their installations. More specifically, relating to:
- Minimal grout joints
- Lippage-free installations
- Having the right tile for the specified installation
- Long-term performance and client satisfaction
As a specifier, you want to make sure to guide your clients to the products that are going to be appropriate for the installation. Expectations play a significant role. If they aren't realistic, no one will be satisfied at the end of the project. Consequently, it's critical to determine client needs and desires, guide them to the proper products, set those realistic expectations, and specify appropriate installation methods.

Tip 2: The Proper Tile Installer is Critical
For successful kitchen and bath installations, the piece in the middle - the installer - is critical for delivering on what the architect, designer and specifier have envisioned to meet and satisfy the needs of the client.
The installer has to be able to take the ideas of the three people on the top row and ensure that they can be installed correctly so as to perform and look beautiful for years to come. Think in terms of Qualified Labor.
>> Locate a Certified Tile Installer
>> Locate a ACT Tile Installer

Tip 3: Tile Installation Standards, Methods and Recommendations Matter
ANSI Standards
Standards for the ceramic tile industry include ANSI A108, A118 and A136. These address product and installation. For example, ANSI standard 137.1 outlines performance for:
- Porcelain tile
- Pressed floor tile
- Mosaic tile
- Quarry tile
- Glazed wall tile
Depending on the installation situation, you'll want to select the right product so - for example - it won't absorb moisture if you put the tile in a freeze/thaw application, or you have the right tile to withstand floor traffic, and you select the correct installation method.
You'll find three categories of tile:
- Natural: tile that is not sized, nor sorted mechanically
- Calibrated: tile that has been sorted and boxed based on its facial dimensions
- Rectified: tile that has had all edges mechanically finished to achieve a more precise facial dimension. This offers the ability to get a smaller grout joint but you still have a minimum grout joint.
>> See Are Credit Card Grout Joints Specified? First Check Tile Industry Standards.
TCNA Handbook
The Tile Council of North American Handbook is considered the Bible of the tile industry.
It is not focused on specifications. Rather, it is a reference guide for methods and installation techniques so that when the ANSI specification calls for an F-144 floor with wood and backer board you have that detail.
Focus on the first 53 pages. There, you will find references for everything from the types of tile, to the types of membranes, backer board and everything related to ceramic tile and the installation products required.
Tip 4: Remember That Local Building Codes Must Be Respected
The last word on an installation and whether it is appropriate or not lies with the local jurisdiction.
Imagine a pyramid. At the foot of it, you have the ANSI Standards and the TCNA Handbook details and methods for installing tile. Next, you have the manufacturer's products that meet those standards. Ultimately, you have local coded which determine whether those products will or won't be used.
Realize that tile standards are voluntary, meaning you don't have to follow them. There is no compliance requirement. However, if something goes wrong and you have a litigious situation, the attorney for the other side will use the ANSI and TCNA documents as the basis for proper installation.
If you follow these guidelines, they can be your best friend. If you don't they can be your worst enemy so always follow the standards and get the job installed correctly the first time.

Tip 5: Know How to Deal With Water and Tile Installations
Water is one of the more popular features in houses today.
If you start from the outside of the envelope, you have the architect and the builder concerned with the roof, the windows and the doors to make sure they keep the inside dry. Yet, there's little emphasis placed on stall showers, bathtubs and other water features.
Realize that the average three by three shower for a family of four showering 12 minutes per shower per day uses 1935 inches of rain per year. That is 45-times more water than what falls on the rainiest roof in Portland, Oregon.
All of that water highlights how critical is it to follow the proper methods and standards for waterproofing and carrying water consistently to the drain, while meeting local building codes.
>> See Does Your Tile Slope To the Drain?
>> See Find the Source of the Water Leak Before Tiling
Also pay attention to how shower doors are installed so they don't undermine the integrity of the waterproofing membrane.
Tip 6: Understand What's Different About Natural Stone Tile
Natural stone has different requirements compared to ceramic tile.
For example, you would normally use a non-sanded grout because the sanded grout will scratch the surface of the natural stone. Stone requires narrow grout joints. Many types of stone can be stained by different products such as cream rinse and hair dye, especially in a shower. Stone isn't glazed and can show traffic patterns. Some stone is water-sensitive.
For all those reasons, you want to make sure to use a product that will stand the test of time. In many cases, porcelain will perform better than natural stone in wet environments.
Stone, though, can be re-polished.
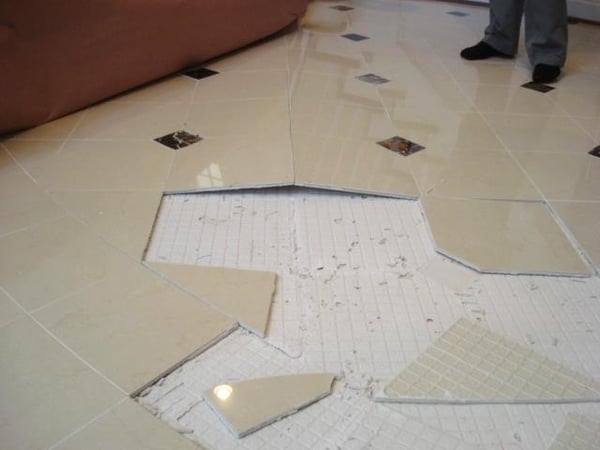
Tip 7: Always Address Movement or Expansion Joints
Structures move. For that reason, it's critical to always include movement accommodation joints or expansion joints per the TCNA Handbook guidelines in EJ171. Otherwise, the installation will fail.
Beware areas with natural light - windows, skylights, patio doors, especially on the southern or western side of the building - that can cause tile to expand and contract and be sure to include movement joints in the installation. As Scott explains, it's the least used, most often misunderstood and most important listing in the Handbook.
- Inside, have those at a maximum of 25 feet in both directions
- Outside, have them at 8 to 12 feet in each direction.
- Interior exposed to direct sunlight or moisture, have them at a maximum of 12 feet in each direction
- An above ground slab, have them at a maximum of 12 feet in each direction
If you plan ahead for movement joints, you can integrate them into the design of the installation. As Scott states in the presentation,
"The Handbook says that design professional or engineer shall show the specific location and details of movement joints on project drawings. It is the job of the architect or design professional to make sure that these are designed, specified and located and detailed on the project drawings. It is not the installer's job to do this but we need the structural person to make sure that these are appropriately placed and will function well."
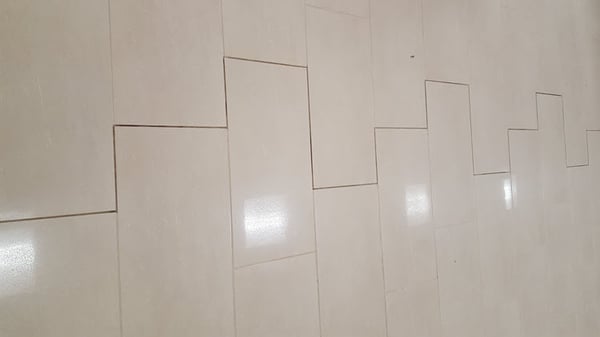
Tip 8: Ramps, Level Changes and Avoiding Lippage
To minimize lippage, here are the recommendations that Scott highlights:
- Follow the ANSI A108 guidelines.
- Specify wider joints for more gradual changes. For any side 15" or greater, you'll want a 1/8" maximum grout joint for rectified tile and 3/16" maximum grout joint for 3/16" calibrated tiles. If warped, add warpage to the size of the grout joint. Have a minimum 1/16" grout joint.
- Consider 33% offset patterns. For any side greater than 15", plan on an offset of 33% or less. For an offset greater than 33%, create a mockup and gain specifier and owner approval for it and for lippage.
- Beveled/cushion edge tiles can minimize the effects of lippage
>> See Dealing With Ramps and Level Changes on Tile Jobsites
>> See Three Lippage Hazards to Avoid
>> See Grout Joint Offsets and Wood Plank Tile
>> See Offsets, Grout Joints and Customer Expectations
Tip 9: Understand the Types of Glass Tile
You'll find three types of glass tile that are fired at different temperatures: cast, fused and low temp coated.
In addition, you'll notice three different size categories:
- Large format is 3x3 to 12x12 (a much smaller category compared to large format ceramic and porcelain tile)
- Mosaics
- Minis
They have separate criteria not only for testing but also in installation methods because glass tile installs differently than ceramic or porcelain.
Note that decorative inserts may be specified for your project. However, there is no standard for these products. They are strictly cosmetic and have no warranties or guarantees. They are not part of the standard.
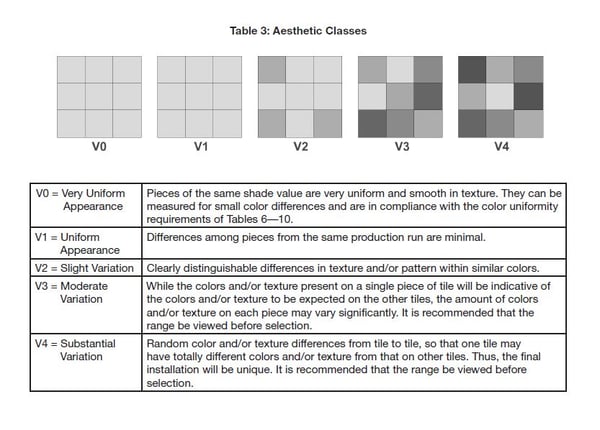
Tip 10: Set Expectations About Shade Variation
You'll find many tile products with some level of shade variation. Some people like substantial variation and others don't. Make sure you set expectations about the products being installed.
>> See How to Prepare for Tile Shade Variation
Tip 11: Know How to Deal with Different Tile Thicknesses
In the presentation, Scott touches on mosaics of different thicknesses.
So are designed to be staggered in dry form and aren't grouted. Other times, a client may want four or five different products that are of different thickness. If that's the case, you'll want to make sure that the surface is flat and may need to build up surfaces where the tile isn't thick enough with an uncoupling membrane or a foam board. That way, you'll have an installation with a flat finish. Note that you don't want to use mortar to build up the surface; not only is it not effective, it's difficult to achieve and keep lippage-free.
In this and most other installation situations, you'll want to insist on a mockup for setting expectations.
>> See Why a Tile Installation Mockup is Really Necessary
Tip 12: Realize that Porcelain is Not Stain-Proof
Porcelain tiles aren't stain proof. You'll find micro pores in polished porcelain tile; if you don't treat them properly they can stain.
A new category of porcelain is gauged porcelain tile and gauged porcelain tile panels/slabs with Standards adopted in 2017 for interior applications. These can be used on walls and countertops; they can even be placed on top of existing tile in remodeling projects.
Tip 13: Hire Only Qualified Labor for Your Tile Installation
Last and far from least, hire Qualified Labor for your kitchen and bath tile installations.
- Look for people that are committed to their craft
- Who stay up to date with new materials and installation techniques
- Who regularly upgrade skills by attending product knowledge or workshop programs

Qualified Labor requirements appear in the Master Spec. You can easily use the language there to add to your own specifications.
You'll also find this information in the TCNA Handbook on page 51.
To locate Qualified Labor for tile installations, explore the CTEF Website. Look for a Certified Tile Installer using the zip code locator.

Depending on the scope of your project, you may prefer to work with installers with Advanced Certifications for Tile Installers (ACT).


Learn More: Download the Fundamentals of Thin Bed Knowledge (FTBK)
For architects and designers who regularly specify tile, glass and stone for kitchen and bath installations, consider learning more. An ideal resources is the Fundamentals of Thin Bed Knowledge (aka FTBK).
It's a self-study program that exposes you to the tile industry and helps you understand what matters in tile installation.
>> See Access Fundamentals of Thin Bed Knowledge at No Cost
Once you've completed the program, you can register to take a knowledge test and receive a certificate of completion.

Watch Scott Carothers Share Tips for Specifying Tile, Stone and Glass for Kitchen and Bath Installations that Work
Here's the presentation. It is 1:20-minutes long and includes questions and answers.